Multisig, while great for those securing serious investments, is often portrayed as being complicated, expensive and scary. We’re here to address this head on because this is just factually wrong and we can prove it.
In this guide we’re going to walk you through it all. Literally every step, every button press, every screen shot and teach you how to create a multisig wallet. After that we’re also going to teach you how to back everything up properly, how to send and receive funds and even how to fully recover everything if the absolute worst happens.
Key to ensuring this multisig setup is simple, cheap and easy is its unique setup. We think this could be an absolute top tier level cold storage setup for basically anyone as it’s:
- Super low cost (less than $60 USD total)
- Super low tech (no passwords to remember and only 1 hardware wallet to learn)
- Doesn’t require you to protect that 1 hardware wallet device
- Protects against many attack vectors and accidental issues as per below
Contents
What Is A Multisig Wallet?
A multisig wallet is a cryptocurrency wallet that operates using more than one key. While single sig wallets use only one private key, multisignature wallets can incorporate up to 15 different private keys that are all used to secure your funds.
Why Use Multisig At All?
Before we get into the full guide, let’s quickly see why those securing serious investments should use multisig over a more traditional single signature wallet. In short it’s because it protects you against a number of extremely low level and bad things such as:
- Single Point Of Failure Protection: One of the most important benefits of a bitcoin multisig wallet is that it eliminates the single point of failure that comes with only having one private key. Maybe you misplace it, maybe you forget the passphrase, maybe it gets destroyed or maybe you just forget where you hid it
- Flawed Seed Generation Protection: Properly generating a secure private key is not trivial and many hardware and software wallets have had flaws. This can result in hackers stealing your crypto whether it’s in a hot wallet or dedicated hardware device. Multisig protects you against this potential catastrophic failure
- Third Party Protection: Hardware wallet providers have the ability to compromise your private key in a number of different ways. From bugs in their code to being coerced by a government, multisig wallets add an additional layer of security to protect you even if they intentionally push you firmware that can extract your private keys
- Seed Phrase Protection: With single key wallets you have to protect that private key with everything you’ve got. If someone gets it, they gain access to all your crypto assets. If the seed phrase backup is stored off site, you may not even know it’s been compromised until all your funds are gone. Multisig bitcoin wallets protect you as if thieves steal a private key, the funds are still safe
- Physical Duress Protection: It’s trivial for a robber to get access to a single signature wallet using physical duress. However as a multisig wallet requires multiple keys, it significantly increases the complexity of a successful attack. Robbers now have to know where the other private keys are stored, how many are needed, get access to those other locations, possibly drive for hundreds of kilometers all while not attracting attention
That’s a lot of potential failure points! There’s also dozens of real world stories about people losing tens to thousands of bitcoins because of these types of failures. Given how quickly bitcoin can increase its value during bull runs it’s also always a good idea to protect your funds as though they are 10x what they are now. So let’s do that.
Quick Setup Overview
The core of the setup we propose is a 3-of-5 Multisig Wallet that uses Sparrow Wallet connected to your own full Bitcoin Node over Tor. There are other software wallets that can manage this type of multisig setup, but we recommend Sparrow.
Our example is for a 3-of-5 bitcoin multisig wallet setup, but everything is the same if it’s a 2-of-3, 5-of-8 etc, you just have to repeat the same steps. We also recommend running a separate full node, for example Umbrel, however you can also just run Bitcoin Core on the computer that runs Sparrow.
Hardware Wallet Choices
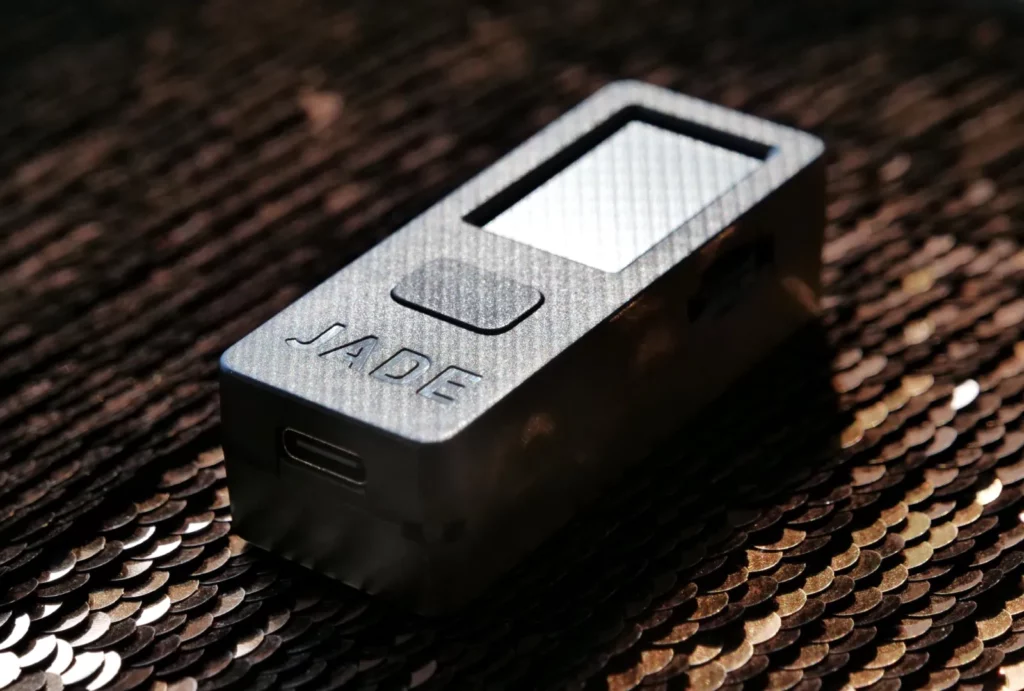
You will only need to buy one hardware wallet (yes we said 1 not 5), however it will need to support operating in stateless mode which is where the hardware wallet is fully wiped each time it’s turned off.
It also must support the open source SeedQR standard which allows your 12 or 24 word mnemonic sentences to be encoded in a standard QR code. The combination of stateless and SeedQR support allows for extremely easy and quick switching between private keys.
Simply turn the hardware wallet on, scan a SeedQR card, sign and turn it off. This process can be done in seconds, is simple and ensures no information is left on the hardware wallet meaning you don’t need to protect it.
Recommended hardware wallets that meet these requirements include: SeedSigner, Blockstream Jade and the Foundation Passport (SeedQR and stateless support coming soon).
Disadvantages Of This Setup
No security setup is ever perfect and if anyone tells you theirs is, run! To create this uniquely simple and cheap multisig setup we’ve had to make one sacrifice, which is to use a single piece of hardware (the Jade) only.
When using multisig it’s recommended to use hardware wallets from multiple different hardware vendors, for example you might have a Jade, BitBox02 and COLDCARD Mk4. This allows your setup to be resilient against supply chain attacks.
If the Blockstream company that makes Jade has a bug in their code, a malicious employee or push out a malicious code update it could compromise the security of your setup. It’s also possible that an evil maid swaps out your single Jade unit for an altered one (or that you received a hacked one in the first place).
Having multiple different hardware wallets that you verify things like receive addresses with helps to significantly reduce these risks and this obviously isn’t possible with just one Jade wallet. It does make the setup far cheaper, simpler and easier though.
Security is a constant trade off between convenience and security, with this setup being no different. A less secure multisig setup is still far safer than a properly setup single signature setup, so perhaps this can be thought of as a first step for people getting into multisig wallets.
After they’re comfortable with it, then they can transition into multi-vendor multisig at a later date. With that warning out of the way…
How To Create A Multisig Wallet
Initial setup is admittedly a bit more involved than your typical single signature wallet, but this is something that only has to be done once. It’s also not complicated as it’s just the same below few steps repeated once for each private key.
Sparrow Wallet
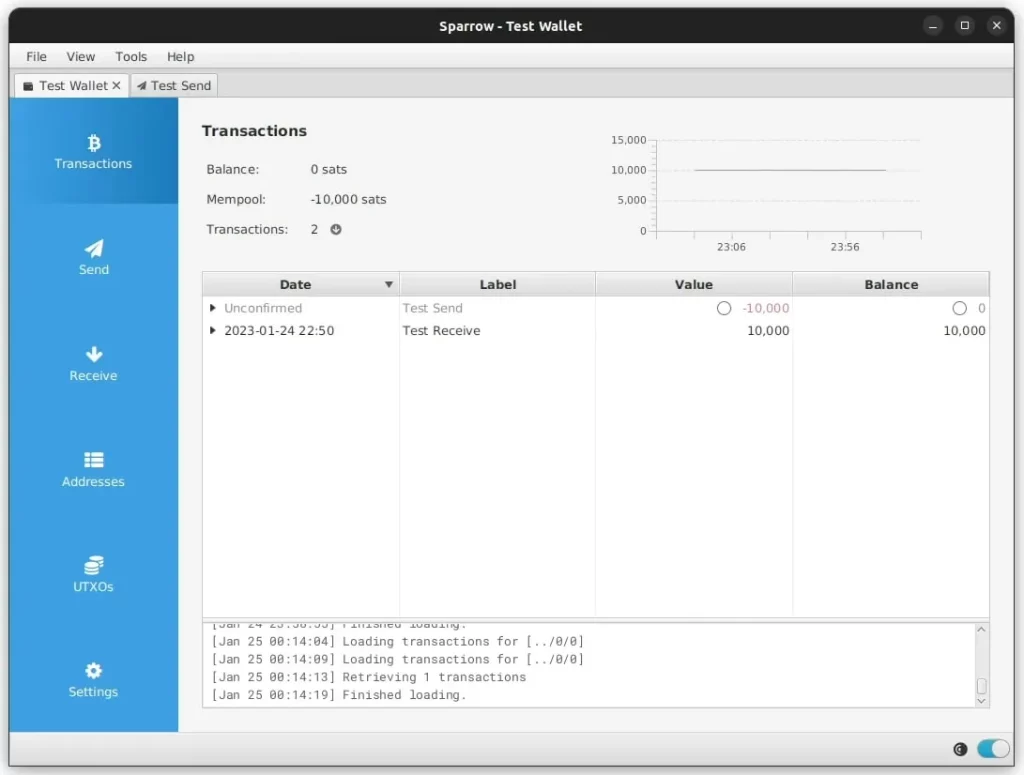
To begin with, make sure you have Sparrow setup and installed. We strongly recommend you fully verify the files to make sure you’re not installing malware. We go through this, step-by-step, in the below guides:
Once you’re comfortable with everything, then you can increase your privacy and security by connecting it to your own private full Bitcoin Node. This can be done in a few different ways:
- Bitcoin Core: If you don’t want to buy any new hardware, you can simply download Bitcoin Core on the same computer you have Sparrow Wallet installed on and use that. Check out our full guide: How To Connect Sparrow Wallet To Bitcoin Core
- Private Electrum Server: Stepping up from just Bitcoin Core, you can download Electrum and host your own private Electrum Server. This requires a bit more configuration and technical know how, but is again, completely free. Check out our full guide: How To Connect Sparrow Wallet To Electrum
- Private Electrum (Node OS): If spending a couple hundred dollars isn’t an issue or you’re not that technical, you can buy your own hardware and run your very own Full Bitcoin Node with one of the many Node OS’s out there. We heavily recommend Umbrel for their excellent interface and ecosystem. Check out our full guide: How To Connect Sparrow Wallet To Umbrel
For the curious, the main difference between connecting your wallet to Bitcoin Core vs an Electrum Server is that an Electrum Server will provide faster (or instant) lookup of transactions by address. This means that your wallet software will load faster.
Seed Phrase Generation
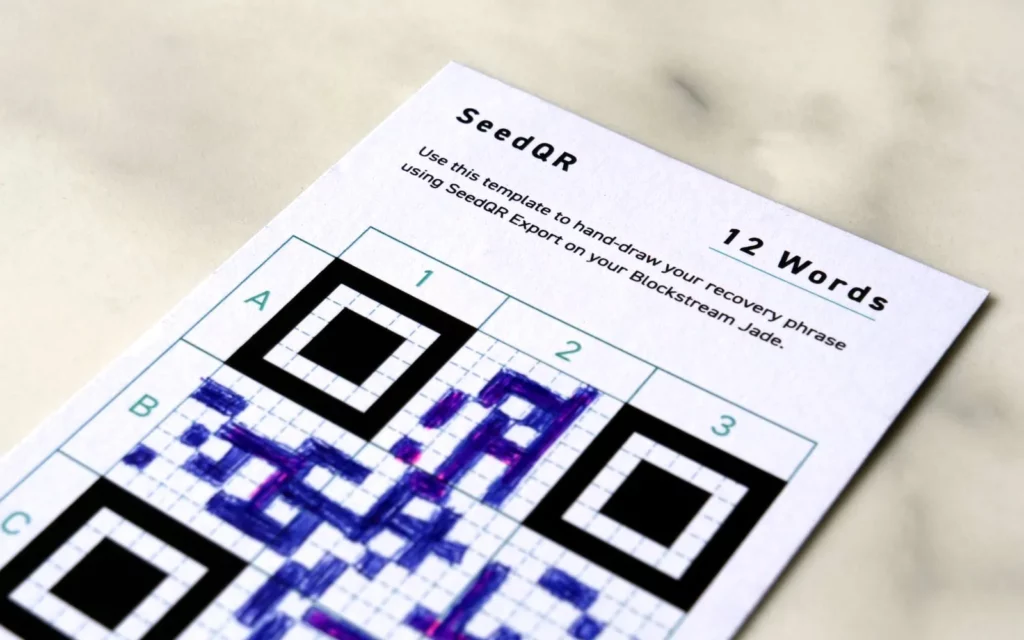
We recommend using the Jade or SeedSigner to generate and verify the 5 seed phrases for you. Both devices have excellent seed generation security and use real world inputs to generate truly random entropy for your keys.
They also have setup wizards that walk you through how to fill in the SeedQR card and checks them to ensure you’ve completed everything correctly. If you don’t trust them, you can also roll dice or use any other method of secure self seed generation, or a mix of the two.
Once the seed phrase is generated you’ll be writing down the 12 or 24 words and then drawing out the SeedQR code. You can find a number of different printable card templates here courtesy of SeedSigner.
We’d recommend using 12 words and printing the actual cards quite large to make it easier to fill out accurately, two separate SeedQR / Seed Word cards per A4 page should be fine. You’ll need to do the below process 5 times, once for each seed phrase.
- Turn the Jade on, go to Setup Jade -> Advanced Setup -> Create New Wallet -> 12 Words
- Write down the generated 12 words on your SeedQR card and verify them when asked
- Choose to export your recovery phrase as a CompactSeedQR code when asked and follow the instructions showing how to draw it on your card. Verify the drawn SeedQR is correct
- Choose not to add a Passphrase, then choose QR as the connection method
- Choose not to add a PIN and scan a SeedQR every session
- Turn the Jade off and repeat steps 1-5 for the remaining seed phrases
At this point you should have 5 separate SeedQR cards with their 12 words on the back and the drawn SeedQR code on the front.
Software Wallet Configuration
Now that we have our 5 private keys generated and in SeedQR form we need to build the 3-of-5 multisig wallet in Sparrow.
Open Sparrow Wallet and go to File -> New Wallet and give your new wallet a name. Under Settings set the Policy Type to Multi Signature and set the Cosigners to be 3 of 5.
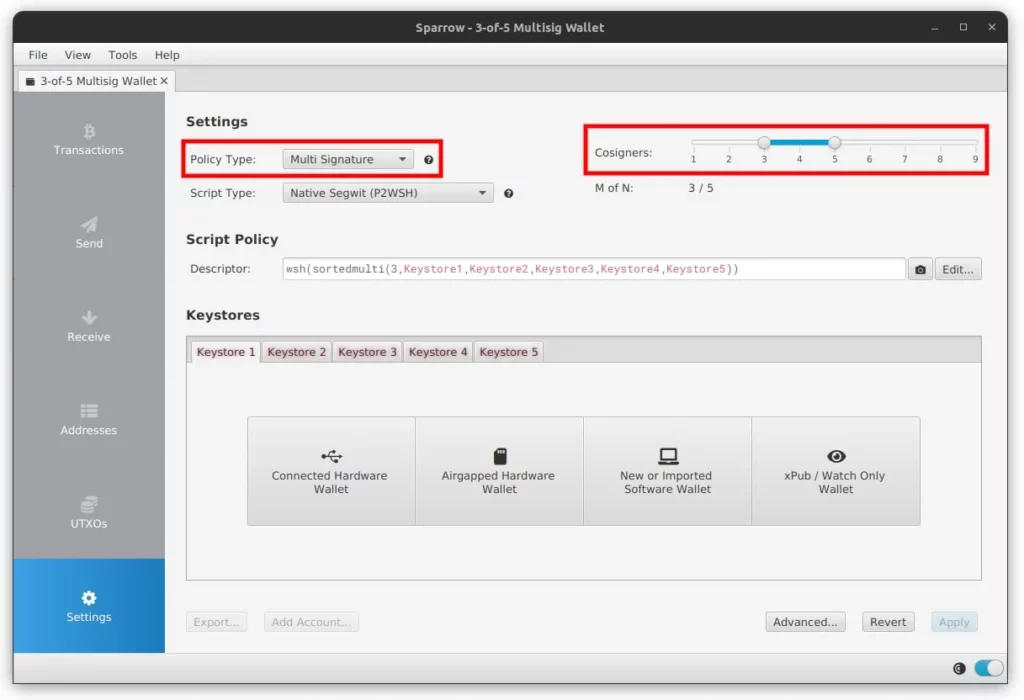
The next step is to import each of the 5 Keystores into Sparrow. This can be done in a few ways, specifically via fully Airgapped QR code scanning, via USB or via Bluetooth. We recommend using the USB connection as this is much faster and easier.
While building this guide we had significant trouble scanning in QR codes back and forth due to the Jade’s quite small screen. The option is there and we’ve given instructions for both USB and QR below, but we preferred USB.
Note: The SeedQR code is how we quickly enter the Private Key into the Jade during its Temporary Signer mode. Once this private key is entered in, you can connect the Jade via QR or USB and use that connection to transfer data back and forth to verify receive addresses or sign transactions. Even if you connect via USB, you will still always need to scan in the SeedQR to begin with.
USB
For each of the 5 Keystores:
- Power on the Jade, go to Options -> Temporary Signer -> Continue -> Scan QR and scan the SeedQR code, then chose the connection type to be USB
- The Jade will then ask you to connect it to a compatible wallet app, plug in the USB cable
- In Sparrow, click on Keystore -> Connected Hardware Wallet -> Scan… and your computer should show you the connected Jade. Click on Import Keystore
- Power off the Jade, then repeat steps 1-3 for the remaining seed phrases
QR
For each of the 5 Keystores:
- Power on the Jade, go to Options -> Temporary Signer -> Continue -> Scan QR and scan the SeedQR code, then chose the connection type to be QR.
- Once the Jade is Active, go to Options -> Wallet -> Export xPub
- A QR code should appear, however before scanning anything go to Options -> Wallet: Singlesig and change it to Multisig, then go back to where the xPub QR is being displayed
- On Sparrow click Keystore -> Airgapped Hardware Wallet -> Jade -> Scan and have your computers camera scan the xPub QR code that the Jade is displaying on its screen
- Power off the Jade, then repeat steps 1-4 for the remaining seed phrases
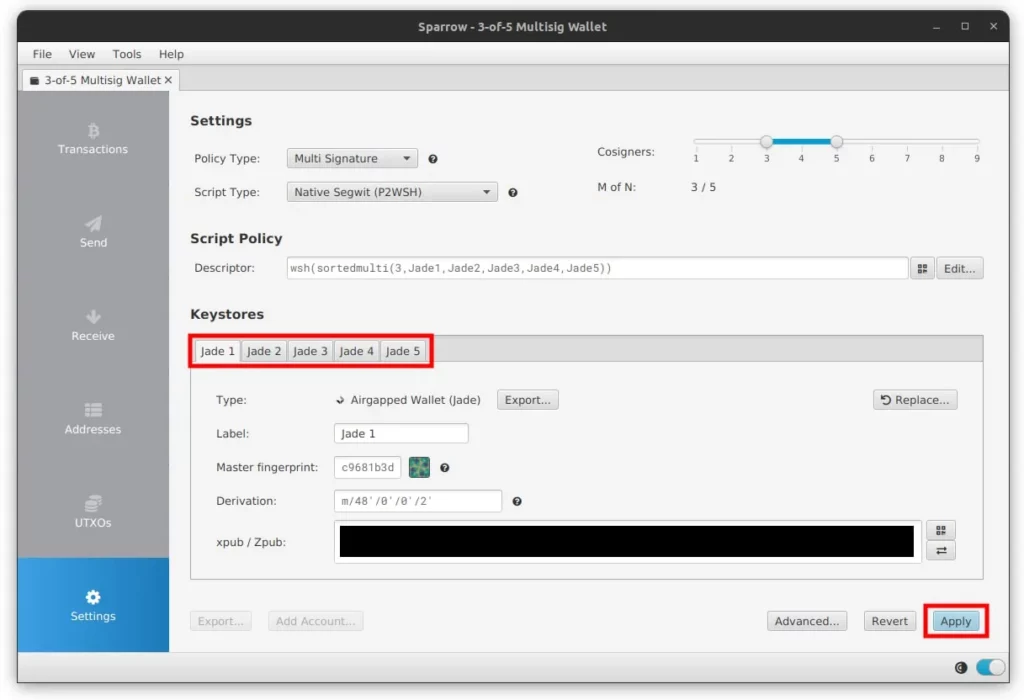
Once all 5 xPubs have been imported into Sparrow it should look similar to above, click Apply and Sparrow will ask you to set a password for the wallet. If you’d like, set a strong password but know this is only to access the software wallet component, nothing else.
After the new multisig wallet is created, Sparrow will display a bunch of information called the Output Descriptor as per below. This is a file that represents all 5 of the public keys that are generated from the 5 private keys as well as some other information about how to build the wallet.
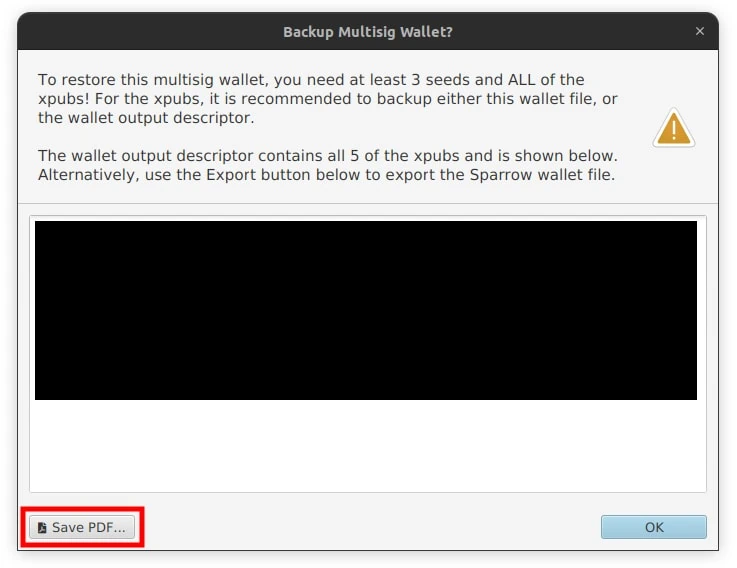
This is critical to backup, so click Save PDF and let’s cover how to do that backing up.
Seed Phrase Storage & Backing Up
One of the main benefits of this setup is that there’s very few things to secure and take care of long term. In fact the only things that you need to be concerned about are:
- Each of the five unique SeedQR cards
- The Output Descriptor information / PDF file
You should choose five separate locations for each of the five SeedQR codes. These are your private keys and each location should be secure (locks, monitored, guards, cameras etc) and preferably be very far away from each other.
With each of the unique SeedQR codes you should also keep a copy of the Output Descriptor PDF file so you have five identical copies in total. If the Output Descriptor file is compromised, the attacker will not be able to spend your funds, but they will be able to see all your transactions and wallet balance.
In order to spend funds you will need 3 of the 5 SeedQR cards and a copy of the Output Descriptor file. Thus it’s critical that you make multiple copies of it and store them securely.
For example:
- Location 1: SeedQR Card 1 + Output Descriptor Copy
- Location 2: SeedQR Card 2 + Output Descriptor Copy
- Location 3: SeedQR Card 3 + Output Descriptor Copy
- Location 4: SeedQR Card 4 + Output Descriptor Copy
- Location 5: SeedQR Card 5 + Output Descriptor Copy
The hardware wallet device itself, being stateless, never has any actual information on it once it’s turned off which means you’re free to keep it anywhere. It doesn’t need a PIN or backing up and can be replaced at any time.
If you’d like, you can engrave the SeedQR codes in steel, but good quality, thick, paper such as Permalife will do fine. It’s also recommended to use pencil, not pen, as it doesn’t fade or smudge. Finally we’d recommend laminating the paper for extra protection against water and damage.
Using The Multisig Wallet
Now that we have our fully functional and properly backed up safe multisig wallet, let’s learn how to actually receive and send funds with it!
Receiving Funds
Receiving funds into a bitcoin multisig wallet is virtually identical to receiving funds in a single signature one. You’ll notice that the receiving Bitcoin address is slightly longer, but aside from that it’s the same process as what you’re used to: generate a new address, verify it on your hardware wallets screen, share the receive address.
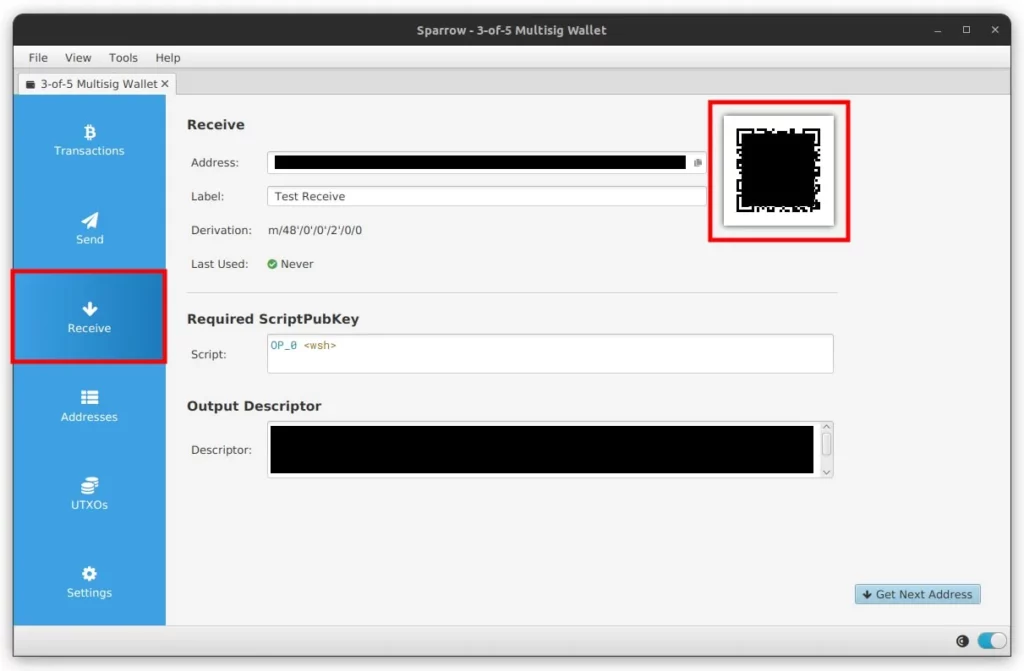
One other small difference with using a multisig wallet is that you’ll need to register the multisig wallet first before you can verify the receive address. On the Jade, even in Temporary Signer mode, you’ll only have to do this once. Again we prefer doing this via the USB connection but have provided both instructions below.
USB
- Turn on the Jade, go to Options -> Temporary Signer -> Scan QR and scan any of the SeedQR codes. Then chose the connection type to be USB
- On Sparrow, it should recognize your connected signing device and display a USB icon in the bottom right hand corner. Once connected go to the Receive tab
- Click the Display Address button in the bottom right hand corner
- If it’s the first time you’re doing this, your Jade will ask you to Register your new multisig wallet. Confirm to register the multisig wallet, confirming each of the signers details
- Your Jade will display your receive address to you on the screen for you to verify
- If the address is verified as legitimate, share the address with the other person
- It’s recommended to Label the address so you know where the bitcoins have come from
QR
- Turn on the Jade, go to Options -> Temporary Signer -> Scan QR and scan any of the SeedQR codes. Then chose the connection type to be QR
- If it’s the first time you’re doing this, you will need to Register your new multisig wallet first. To do this on Sparrow, go to File -> Export Wallet -> Jade Multisig -> Show, this will show you a large, animated QR code that houses the full multisig wallet configuration
- Once the Jade is Active, go to Scan QR and scan the large animated QR code from Sparrow
- Confirm to register the multisig wallet, confirming each of the signers details
- Now that your multisig wallet is registered, on Sparrow, go to the Receive tab and click the QR code to make it bigger
- On the Jade go to Scan QR again and scan in the QR code. Click Verify Address, then use your newly registered wallet
- If the address is verified as legitimate, share the address with the other person
- It’s recommended to Label the address so you know where the bitcoins have come from
When receiving funds with any Bitcoin Wallet, single or multisig, also always remember:
Never reuse Bitcoin addresses!
Reusing addresses puts your privacy at risk and isn’t considered good practice. Generating new addresses is free and they are infinite, so there’s no reason to reuse an address.
Once the other person has sent you the bitcoins Sparrow Wallet will notify you and another fresh new address will be generated for you to use. While some wallet programs reuse addresses it’s considered very bad Bitcoin Privacy to do so.
Sending Funds
When it comes to sending funds, things are again mostly the same as single signature wallets. The main difference is that obviously you need to sign the transaction with multiple private keys.
To send funds open Sparrow Wallet and click on the Send tab on the left hand side. Copy the Bitcoin Address you’re sending the funds to into the Pay To field and add a Label to help you identify the transaction in the future.
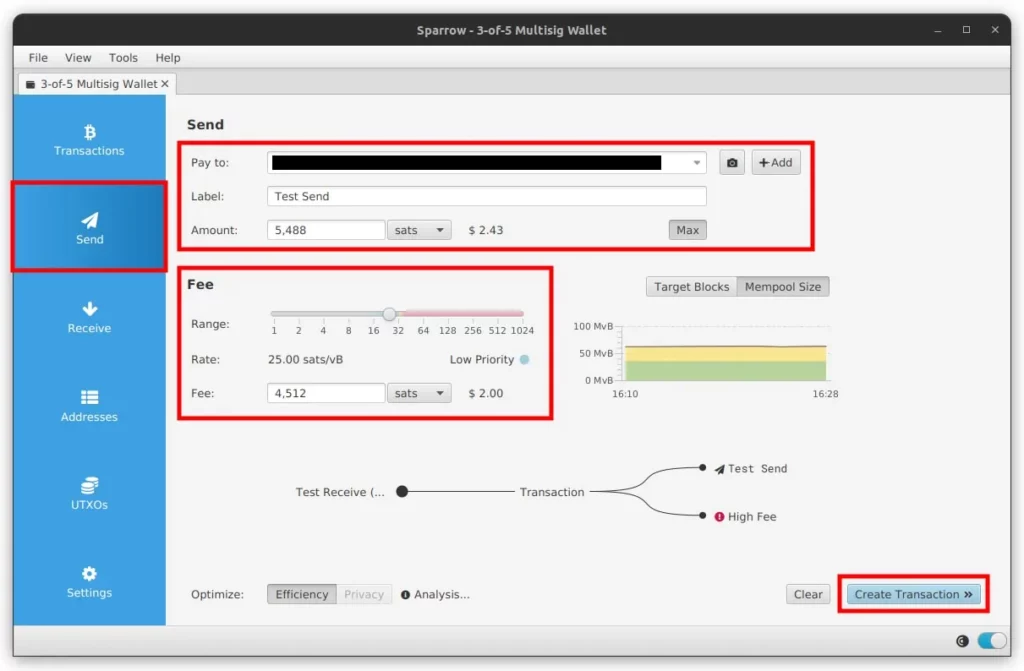
In the Amount field, enter the amount of bitcoins you want to send, set your Fee and then click on the Create Transaction button in the bottom right hand corner. On the next screen review all your transaction details and if you’re satisfied, click Finalize Transaction for Signing.
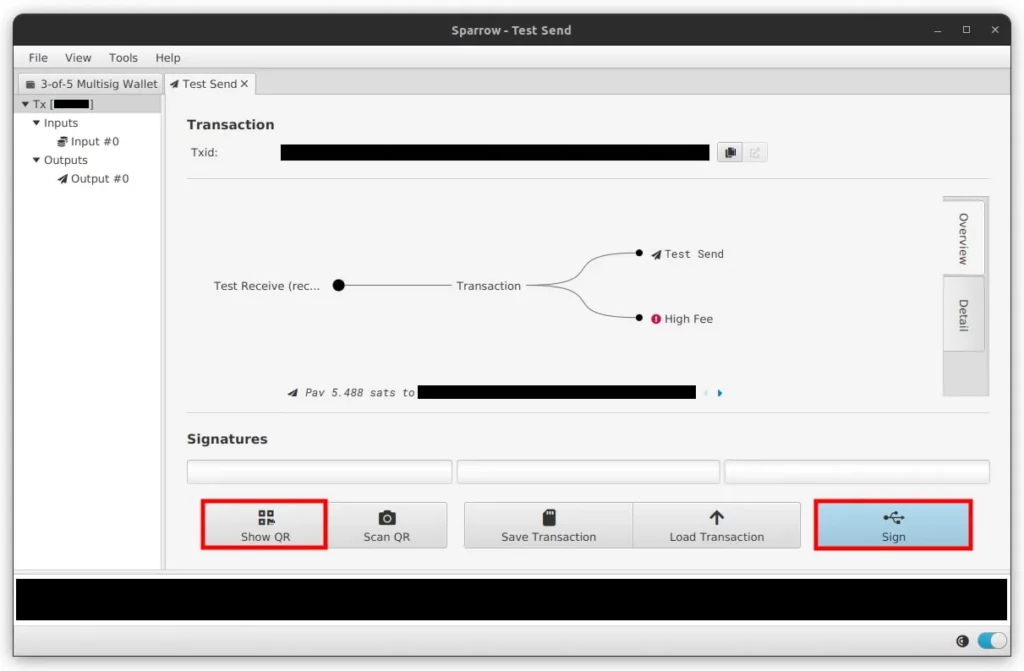
On the next screen you’ll be given multiple ways to sign your transaction. To fully sign you will need 3 of the 5 SeedQR codes with you as indicated by the three signature bars down the bottom. Once the SeedQR card private key is scanned into your Jade you can connect it and sign using either USB (Sign button on the right) or QR connectivity (Show QR button on the left).
USB
- Turn on the Jade, go to Options -> Temporary Signer -> Scan QR and scan the SeedQR code. Then chose the connection type to be USB and connect your USB cable, after a few seconds it should recognize and connect to your Jade
- Click the Sign button on Sparrow and then click Sign again in the popup window
- Verify the transaction details on your Jade and if correct, approve to Send Transaction. Your Jade will then sign the transaction and the first of your three signature boxes should be colored in
- Power off the Jade, then repeat steps 1-3 to sign with the other 2 SeedQR codes
QR
- Turn on the Jade, go to Options -> Temporary Signer -> Scan QR and scan the SeedQR code. Then chose the connection type to be QR
- Click the Show QR button on Sparrow, then go to Scan QR on the Jade and scan the animated QR code that’s displayed
- Verify the transaction details and if correct, approve to Send Transaction. Your Jade will then sign the transaction and generate another animated QR code on its screen
- On Sparrow, click the Scan QR button in the bottom right hand corner of the popup and use a camera to scan the Jades animated QR code
- Once Sparrow has scanned it in, the first of your three signature boxes should be colored in
- Power off the Jade, then repeat steps 1-5 to sign with the other 2 SeedQR codes
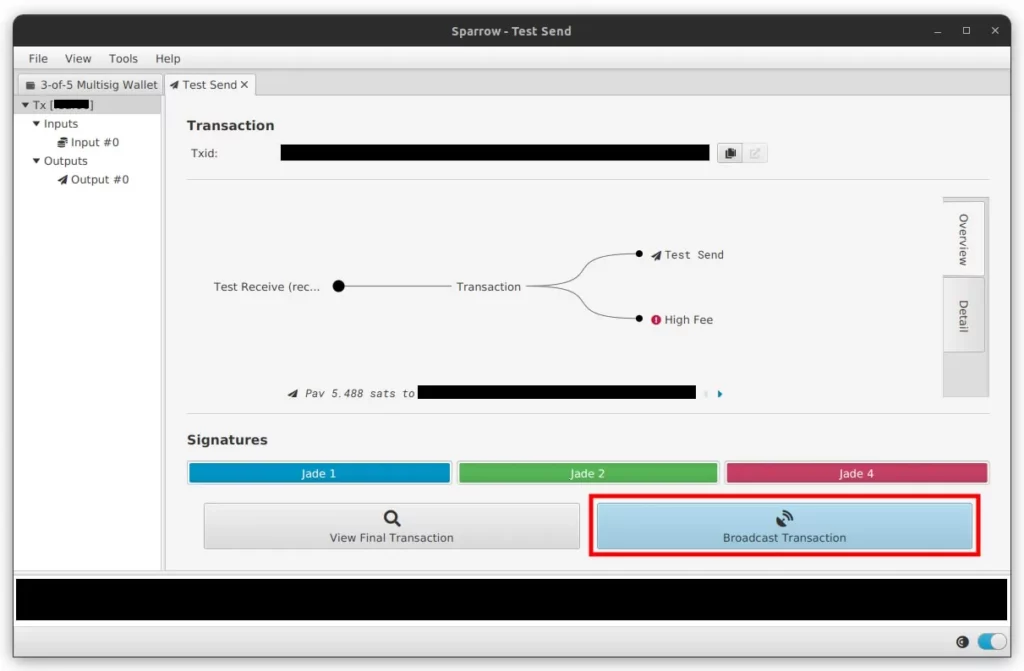
After you’ve signed with three of your five private keys Sparrow will move to the next screen which should look similar to the above picture. Click the Broadcast Transaction button to broadcast your fully signed transaction to the Bitcoin network.
Wallet Recovery
The final thing you should know how to do with your new bitcoin multisig powers is fully recover your wallet. Now there’s a few different reasons you might end up needing to do this so it’s good to have experience with it just in case.
If you’re just formatting your computer and want to save everything, then you can export your wallet from Sparrow by going to File -> Export Wallet -> Sparrow -> Export File. This also allows you to export it in different formats if you’d like to migrate to another wallet software like Specter DIY.
But what if something bad happens? Like, really bad. Let’s say your house burns down and you have no Sparrow wallet backup. Your Jade hardware wallet is toast and so is one of your SeedQR cards. All that’s left are your four remaining SeedQR cards and the four Output Descriptor PDF files that are with each of them. How do you recover?
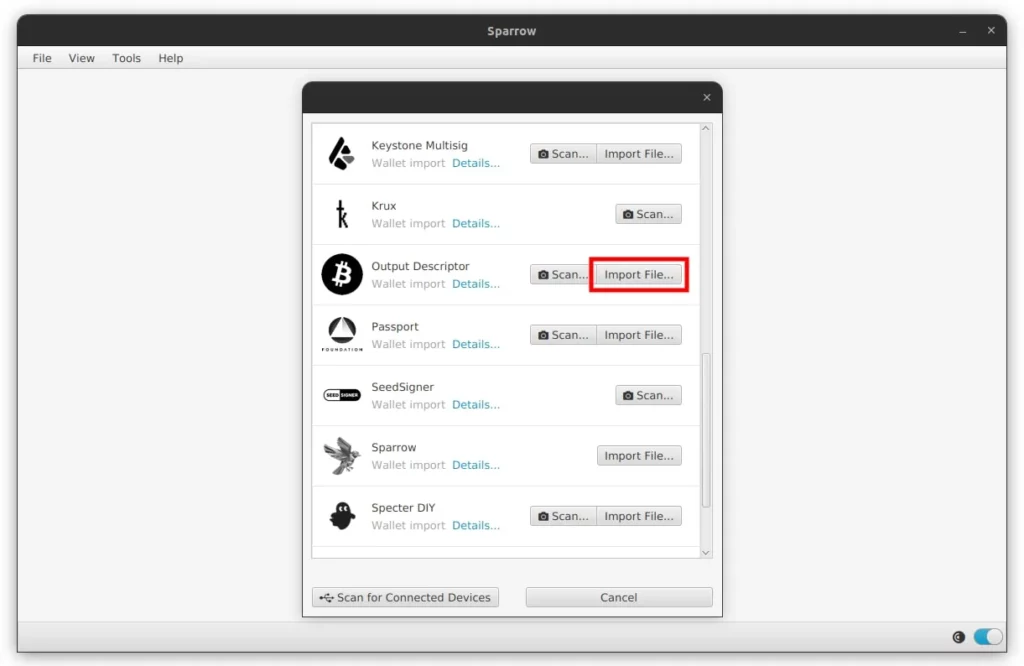
- On your new PC, install Sparrow and connect it back up to your new full node
- Open Sparrow and go to File -> Import Wallet -> Output Descriptor -> Import File
- Open your saved PDF Output Descriptor file and give your new wallet a name and password
- Now that your wallet is fully recovered you can spend your funds again using 3 of your 5 SeedQR cards
This will even work if two of your five private keys (the SeedQR cards) are lost giving excellent redundancy against thieves, everyday mistakes, natural disasters and more.
Athena Alpha’s Take
If you’re still reading then congratulations, this article isn’t a small read! However we wanted to ensure it was a single, fully contained multisig hardware wallet guide from start to finish.
This suggested multisig setup enables you to benefit from the huge added protections that multisig brings whilst at the same time keeping everything you need to remember and secure at a bare minimum. The entire setup is just:
- 5 x SeedQR Cards
- 5 x Output Descriptor PDF Files
- 1 x Jade Hardware Wallet
Most equivalent multisig setups would involve five hardware wallet devices, likely from different vendors. This means each hardware wallet has to be physically protected. You have to also remember the PIN for each of them as well as how to use each of their different work flows.
You also still have to guard the five separate seed phrases and the same output descriptor files. Each of the hardware wallets will need different software upgrades and you’ll likely want your partner, family or next of kin to also know how to use it all too, making explaining the far more complicated workflows even harder.
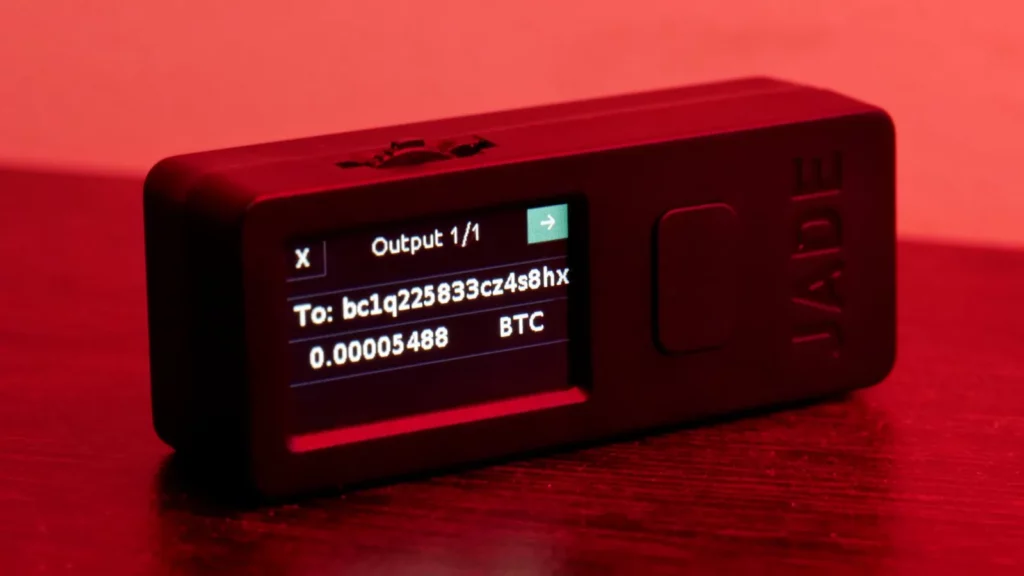
You’re also limited by cross compatibility and wallet support by the software program, in this case Sparrow. On top of all this, it’s just way more expensive as you have to buy five hardware wallets instead of just one Blockstream Jade that costs less than $60 USD when you use our code.
Is a single signature wallet still easier? Of course. But after the one time setup both sending and receiving of funds is mostly the same and single signature wallets are a single point of failure that can go wrong in a number of different ways as stated at the start of this piece.
Once setup, our solution protects against all of this, is simple to maintain and operate and costs very little. The hardest part is simply coming up with five separate, secure locations to store each SeedQR card and Output Descriptor file!
Maybe one day multisig will get even easier than this. Maybe our proposed Time Locked Multisig architecture will be the future. All we know for sure is that Bitcoin is just starting its journey. In another 20 years things will be orders of magnitude safer and easier again.
Until then, you now know how to use multisig.

