In this third and final part, as promised, we’re going to go through how to setup a top tier, institutional grade level Bitcoin Multisig Wallet solution. This Vault will meet the vast majority of requirements set out by companies that custody billions in Bitcoin. It will also be something you can personally setup all for a one time, up front cost of about $500 USD.
This is the third and final part of our Expert Bitcoin Multisig Vault series. You should read the first (Expert Cryptocurrency Security) and second (Bitcoin Multisig Vaults) parts before reading this third, final part.
Is this solution more complicated and technical than a single signature wallet backed by a single hardware wallet? Yes. But that’s because this is what those with serious funds should be doing. While it’s more complex and has more hardware, it also protects you and your funds from a broad range of attacks and faults that a single sig setup can’t.
To make this extra clear: You should be an advanced and preferably expert Bitcoin user to use this setup. In the right hands multisig is amazing, but in the wrong hands it can end with you losing all your funds.
Contents
Bitcoin Multisig Wallet Overview
The custody solution we propose, referred to from now on as the “Vault”, is a 2-of-3 Multisig Wallet, using 3 Hardware Wallets and the coordination software Sparrow that’s connected to a privately owned and run Full Bitcoin Node. To spend funds requires signing from any 2 of the Private Keys and the Wallet Output Descriptor file.
These 2 Private Keys will normally take the form of 2 Hardware Wallet devices, but if they fail or are lost / stolen, new Hardware Wallets can be rebuilt using the Recovery Seed cards.
Hardware Wallets
You can choose any device as your Hardware Wallets, however we’d obviously recommend ones that have scored the highest in our Crypto Wallet Comparison. These are devices that are the best of the best of the best:
Importantly you should try and choose three separate Hardware Wallets from three separate manufacturers. While it’s not terrible to have two or even all three be the same brand and model, choosing three different types gives you multiple levels of protection at multiple different points.
First it ensures that if there’s a bug or vulnerability in the Private Key generation software and it’s compromised in some way either to begin with or in the future it won’t result in a loss of all funds.
Secondly it provides you with three independent hardware and software stacks to verify against each other. If all three generate the same receive addresses we can be much more confident that all are operating correctly and that none have been compromised or are just operating in some strange way.
For example, whether through a software glitch, buggy code, faulty hardware or even solar radiation causing bits to flip a single Hardware Wallet might generate an incorrect receive address. If we were to then send funds to that address they might become lost. Cross referencing addresses between independent hardware stacks is extremely helpful at detecting errors or hacking attempts.
Having different brands and models does increase complexity as you need to learn how to use each of them and ensure they operate well together, but it’s a one time learning curve that results in permanent long term additional security.
When choosing your Hardware Wallets we’d also recommend you ensure they have:
- Excellent privacy and security scores from our ratings board
- Excellent multisig support
- Support for Bitcoin only firmware
- Support for exporting encrypted backups to a microSD card
- Support for exporting PSBT’s to a microSD or QR code so the Vault can be fully Air Gapped
If for example you bought a COLDCARD Mk4 ($158), Foundation Passport ($199) and BitBox02 ($160) it would set you back $517 USD. Even if you don’t have your own Full Node and had to buy that too (How To Build A Sexy Umbrel Node For $300) you’re still talking about spending, in total, well under $1,000 USD.
Not bad for institutional grade level security considering it’s capable of storing any amount of bitcoin funds and should reasonably last you 10+ years!
Wallet Packs
Wallet Packs, the things that will be stored at the various secure locations, will consist of either a Hardware Wallet with its encrypted backup on a microSD card or a Recovery Seed card inside a Tamper Evident Bag that has a unique serial number on it.
This serial number, along with all other inventory information such as passwords to encrypted backup files, Hardware Wallet PIN codes etc, should be stored somewhere that is safe and that itself has a robust backup strategy in place for it.
While you may prefer not to write down these passwords, PINs etc we’d heavily recommend it in some form and with multiple backups. As stated in the first two parts of this series, you are your own worst enemy! You forgetting the PIN to your own Hardware Wallet or other “simple” mistakes like this are the most common ways people lose their funds (besides hacking of a single sig private key).
Having a database with all this important information setup not only mitigates these risks, it also helps in inheritance planning and recovery during times of emergencies. Furthermore, even if these details do get compromised somehow, the attackers still won’t be able to actually spend your funds as the database does not contain signing capabilities or the Private Keys.
Secure Your Environment
Confidentiality is required to ensure that any sensitive data such as Private Keys or information about the Bitcoin Multisig Wallet are not read or copied by an unintended party. When you interact with any Private Keys, seeds, Hardware Wallets or software, there is the potential for information to leak.
Setup Your Software Environment
- Review any computer or phone being used for malware or suspicious activity. If unsure, fully reformat the device. If possible, disconnect it from the Internet for the duration of the task
Setup Your Physical Environment
- Turn off or disconnect as many devices as possible from the network. Try and have the computer you’re working on and your full Bitcoin Node as the only devices on the network
- Ensure no humans or cameras have visual line-of-sight into your environment. Close doors and blinds
- Ensure sound will not travel easily outside your environment. Shut down devices with microphones (e.g. smartphones, home assistants and other laptops) and turn on a fan to generate white noise
- Unplug any hardware from the wall and run them only on battery power if turned on
- Ensure all other computers and smartphones are turned off and removed from the area
Buy, Validate & Setup Your Hardware Wallets
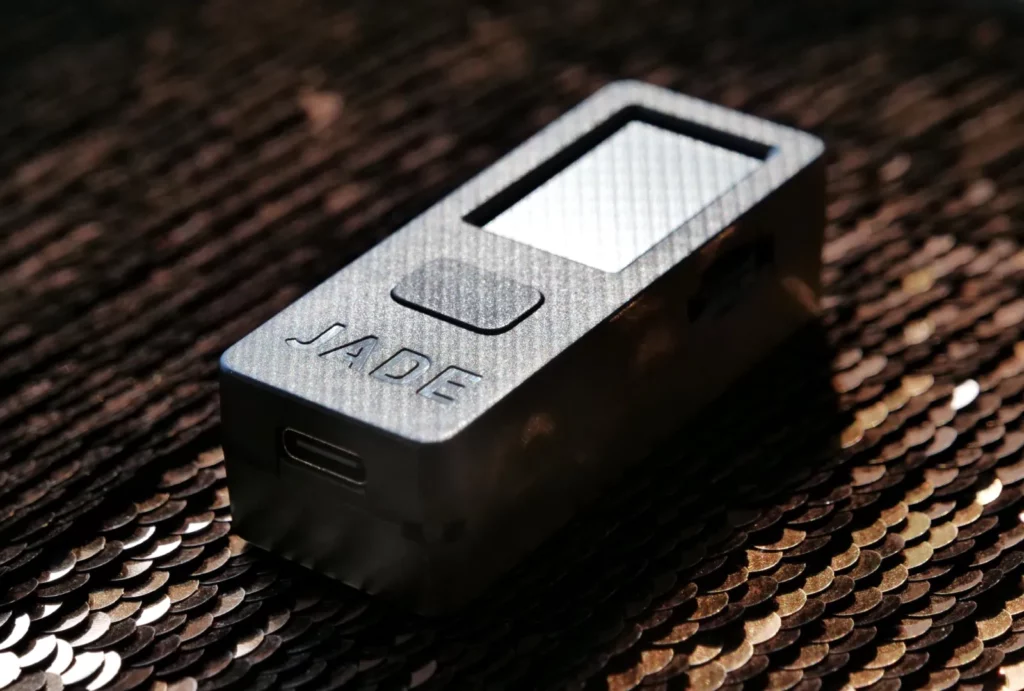
All Hardware Wallets should be brand new and bought directly from the manufacturer. Never purchase devices from third parties on resellers as the devices can be tampered with.
Purchase them using non-KYC bitcoin with a randomly generated name and a throw away Proton email address that is created and accessed only via Tor. They should not be delivered to any address that’s tied to your identity.
If your chosen setup is going to be fully air gapped, make sure you never plug any Hardware Wallet device into any computer at any point in time. Only use USB-C chargers that are plugged into the wall, not a computer to power them. This maintains the air gap quarantine and ensures the devices integrity
- Verify: Turn on your Hardware Wallets and go through the device manufacturers verification process to confirm that it’s a genuine device and hasn’t been tampered with during shipping
- Update Firmware: Download the latest firmware for your Hardware Wallets and update them. Make sure it’s downloaded directly from the manufacturers website and verify that you’re on the correct domain by searching for the brand and comparing the site to what’s returned in the search result. Once downloaded, make sure you verify the PGP keys used to sign the software as well as the firmware hash is correct. Then find a well regarded brand of microSD card, fully format it and copy the new firmware over to it. Update your Hardware Wallets and if possible, check to make sure the hash of the installed firmware on the device matches what’s displayed on the website
- Set PIN: Choose a PIN for your Hardware Wallets and note them down. PINs should use the full length possible and be randomly generated. A good way to generate a random PIN is to enter in a large amount of random data into a Hash Function and then use a random segment of its output as the PIN. You can use free, online hash tools like SHA512 or use software on your computer with it in offline mode
During the setup process of most Hardware Wallets they will automatically generate a new Private Key / Seed Phrase / Wallet for you. So let’s go through that now!
Seed Generation
As mentioned above, in order to protect against any of our Hardware Wallets having malicious code or security flaws in them, you should try and have three separate Hardware Wallets. Each of them should also be generating their Private Keys in a different, but industry standard, way. This refers back to the DRBG Compliance part of our Seed Generation requirements list:
The Private Keys should be generated using cryptographically secure hardware such as a Deterministic Random Bit Generator (DRBG) that conforms to NIST SP 800-90A, a Non-deterministic Random Bit Generator (NRBG) or a “True Random Number Generator” (TRNG) that passes industry-standard statistical tests for randomness such as DIEHARD, Crypt-X, or NIST STS. These number generators should also be seeded with at least two separate cryptographically secure sources of entropy that have been combined in a cryptographically secure manner. Private Key generation should also include unique, just in time randomness from a real world random source such as resistor values, radio waves, a picture taken on boot or user inputted randomness from things like dice rolls
To make sure your Hardware Wallet choice complies to this standard, go to our Wallet Compare page, click on the “i” information icon next to the Hardware Wallet choices name and check its score under the Privacy & Security -> Seed Generation area.
If it scores a 4/4 and states that it “Uses multiple unpredictable physical processes to generate the seed” then you’re all good.
This way, even if there is a security vulnerability in one of the Hardware Wallets found in the future, all funds in the Vault will remain secure. As per industry 3-2-1 data storage best practices, each Private Key will have 3 copies:
- Hardware Wallet X: The Hardware Wallet device itself (encrypted by PIN)
- microSD Card X: A backup file, stored on a microSD card (encrypted by password)
- Recovery Seed X: A piece of laminated paper or a stamped metal seed plate, with the 24 seed words written down on it
The “X” value is the unique name of each Private Key. Some people assign numbers, however it’s a better idea to assign each key a name as otherwise it can give clues to the size of your custody setup. For example “Recovery Seed 4” is more likely to be part of a 3-of-5 multisig wallet than “Recovery Seed John”.
New to Athena Alpha? Start today!
Seed Generation & Testing
Now we get to the all important part of actually generating the Private Keys. Follow the below steps in this order, one Hardware Wallet at a time:
- Secure Environment: Make sure you’ve secured your environment as above
- Generate Private Key: Using your Hardware Wallet instructions, go through and generate a new 24 word Private Key. The Private Key should be generated by you and you only, no one else. It should be generated in real time, right then and there and no one else should see it
- Write Down Seed Words: Once the Private Key is generated, write down the Seed Words on your Recovery Seed X paper (with pencil not pen!) or seed plate. Most good Hardware Wallets will also ask you to confirm your Seed Words by testing you
- Master Fingerprint: Find the Master Fingerprint characters for your Private Key and write it down on your Recovery Seed X paper or seed plate. Also write this Master Fingerprint information down in a safe place along with your PINs etc as well. The Master Fingerprint should be 8, unique characters and is usually found under the “About”, “Info” or “Identity” menus
- Backup To MicroSD Card: Once the Seed Words have been verified, backup the Hardware Wallet to its own unique microSD Card X. Write down any passwords or codes that are created to encrypt the backup in a safe place
- Recovery Testing: Finally delete the newly created Private Key / Seed or fully reset your Hardware Wallet. Once deleted, login to the device and import your Private Key using the Recovery Seed paper or seed plate you’ve just made. Once it’s been successfully entered, navigate back to the Master Fingerprint area and confirm that it matches what you wrote down before. If it matches, you’ve verified that your Private Key can be fully restored if your Hardware Wallet ever suffers a catastrophic failure
These steps take quite a while to do, given you have to do them all three times, but they’re vitally important. Each of these Private Keys forms the core of your multisig Vault. You need to be absolutely certain they’re generated securely, privately and backed up correctly.
Lamination, Labeling & Inventory
Label the 3 separate copies of each of the 3 Private Keys with the standard names:
- Hardware Wallet X: The Hardware Wallet device itself (encrypted by PIN)
- microSD Card X: A backup file, stored on a microSD card (encrypted by password)
- Recovery Seed X: A piece of laminated paper or a stamped metal seed plate, with the 24 seed words written down on it
Each of the 3 Recovery Seed cards (or steel plates) should have the following data:
- The name of the Recovery Seed card (Recovery Seed X)
- The 24 word mnemonic sentence (the seed phrase)
- The Master Key Fingerprint (the 8 character code)
Seed generation and testing is now complete, now let’s create the Bitcoin multisig wallet!
Wallet Creation
Now that we have all 3 Private Keys generated and backed up, it’s time to build the actual 2-of-3 multisig wallet using our Sparrow wallet coordination software. Sparrow is one of the best desktop wallet applications and has no affiliation with Athena Alpha or any Hardware Wallet.
The Bitcoin multisig wallet (Vault) it will create can be imported and used by many other independent third party wallets if required.
Caution: Never use mobile wallets. While there are some fantastic and safe options, these are only meant to store small amounts of funds. Mobile devices are exposed to remote threats and are easily lost, meaning more headaches and greater risk. Storing a key to a material portion of your wealth on an online device that you carry on your person is an unacceptable compromise
You should verify that the software is legitimate and not tampered with, as well as connect it up to your own full Bitcoin Node. This will ensure that every transaction that’s broadcast is done privately as well as ensure that any funds that are received are fully validated to be legitimate according to the Bitcoin Network.
First, follow the below guides to download, verify and install Sparrow:
Once installed, connect Sparrow up to your Umbrel full Bitcoin Node by following our How To Connect Sparrow Wallet To Umbrel guide. Once installed and connected it should look like this, with a blue toggle in the bottom right hand corner:
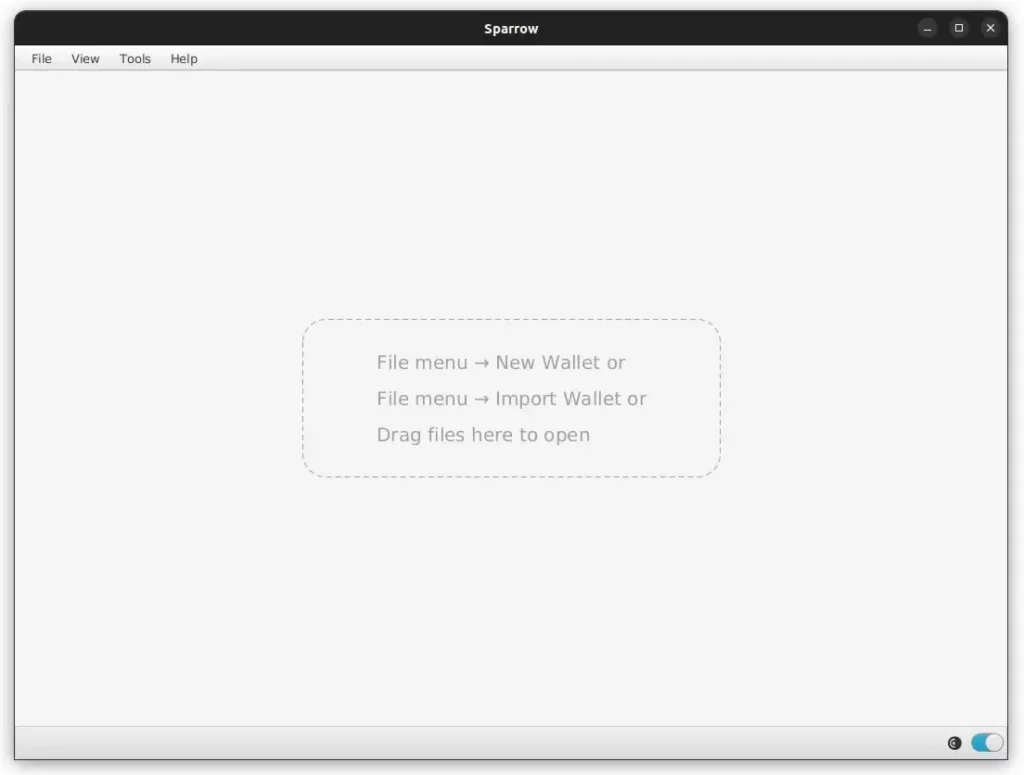
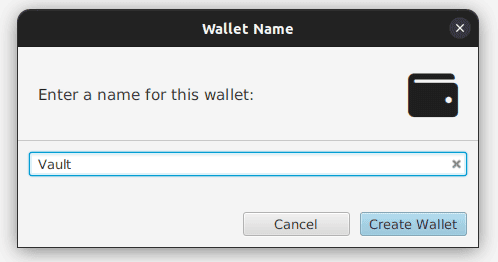
Navigate to File -> New Wallet and give it a name “Vault”
Under Settings set the Policy Type to Multi Signature and leave the Cosigners to be 2 of 3
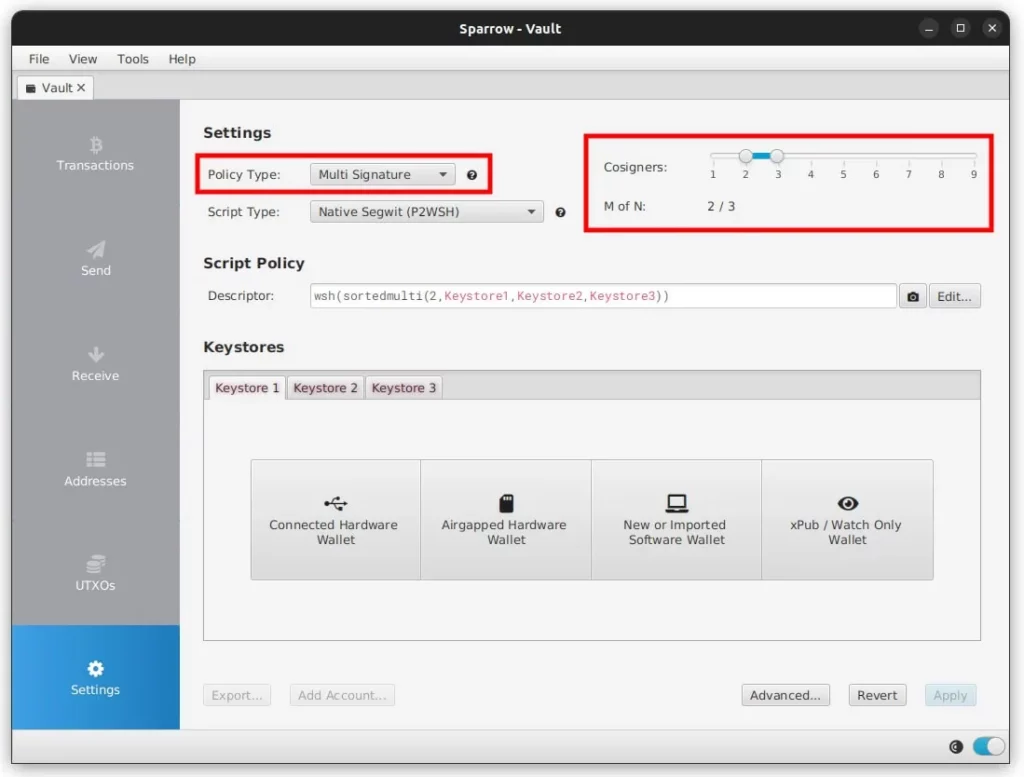
Add keystores
Next we need to export the xPub information for each of the three Private Keys and import that data into Sparrow’s Keystores area.
If you’re using an air gapped Hardware Wallet you will need to export the xPub from it to a microSD card and then import it into Sparrow by clicking on the Airgapped Hardware Wallet button. Obviously each Hardware Wallet has its own way to do this export function, so if you’re not sure have a look at that Hardware Wallets documentation.
If you’re using a USB connected Hardware Wallet like a BitBox02 or Trezor Safe 3, click on the Connected Hardware Wallet button Sparrow. This will connect to the Hardware Wallet via USB and copy over the required data.
Backup Output Descriptor
Once all 3 Keystores are completed, click on Apply in the bottom right hand corner in Sparrow and enter in a long, randomly generated password. This password is only to secure and encrypt the Sparrow wallet file and should be noted down in a safe place.
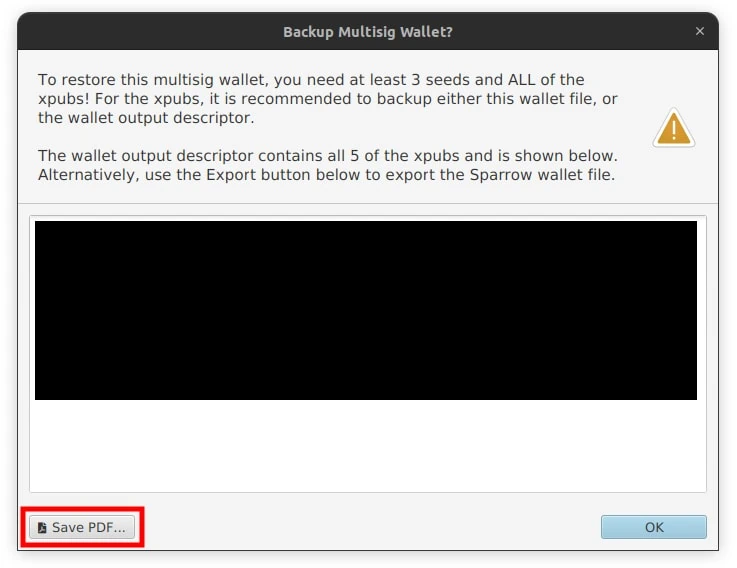
The 3-of-5 multisig wallet is now setup on Sparrow and a popup will appear with a huge text box full of characters. This is the Wallet Output Descriptor or multisig wallet configuration file. Click the Save PDF button in the bottom left and save the file to a safe place, ensuring it’s backed up appropriately.
Export Multisig Setup & Testing
If you’re using any air gapped Hardware Wallets, you’ll now need to export this newly created multisig wallet setup back onto the microSD card so you can import it back into the Hardware Wallet.
Click the Export button in the bottom left corn of Sparrow and click Export File for the brand of Hardware Wallet you have and save the data file to the microSD card. You can also do this via animated QR codes too.
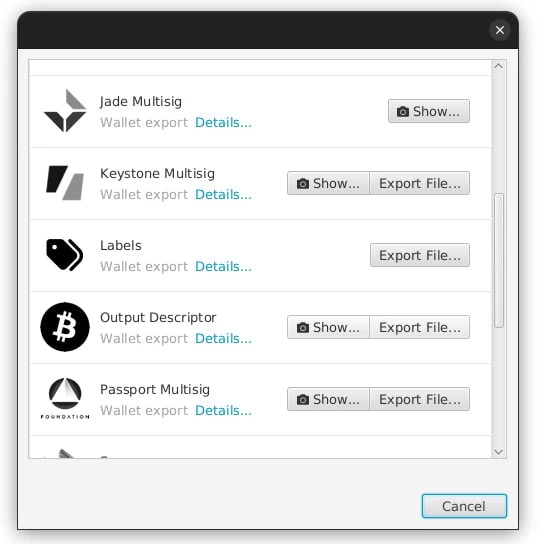
On the air gapped Hardware Wallets, import the multisig wallet data file. When importing, make sure you confirm that what’s stated on the Hardware Wallet screen matches what’s shown in the Sparrow Keystores area for all three keys. They should all match perfectly.
Next we want to confirm all 3 Hardware Wallets generate the same receive address so that we’re certain everything has been configured correctly and that all data has been shared without alteration.
On each Hardware Wallet, navigate and view the first receive address. Compare all three Hardware Wallets with each other as well as with the Sparrow receive address (click on the Receive tab). They should all match perfectly.
Note: Make sure you verify all characters in the address, not just the first few and last few
Backing Up
As we’ve now created a multisig setup on each of the Hardware Wallets and added to their configuration, we need to backup this new configuration again. Backup each Hardware Wallet to its own unique microSD Card X.
Finally we fully backup the Sparrow wallet. Navigate to File -> Export Wallet -> Sparrow -> Export File and save the encrypted “.mv.db” file in a safe location, preferably offline or on a computer that’s not connected to the Internet. We’d also recommend saving it with the date in the file name.
Funds Control & Device Recovery Testing
Now that the Sparrow 2-of-3 multisig Vault is created and all of the three Hardware Wallets have been configured and backed up, it’s time to put them through some more testing to ensure that any funds we deposit to them are fully under your control and are spendable.
We’ll then also test to make sure that the Sparrow wallet and a random Hardware Wallet can be fully recovered from a test disaster scenario. This is to test recovery capabilities obviously, but it also helps you to go through the full process at least once so if it’s required in an actual emergency, it’s not as scary or unfamiliar.
Funds Control Test
Perform a test deposit and withdrawal to ensure that the three Private Keys that make up the Vault are indeed controlling the receive addresses that they’re generating. This only has to be done once after setting everything up, but is important to verify before depositing larger amounts in the wallet,
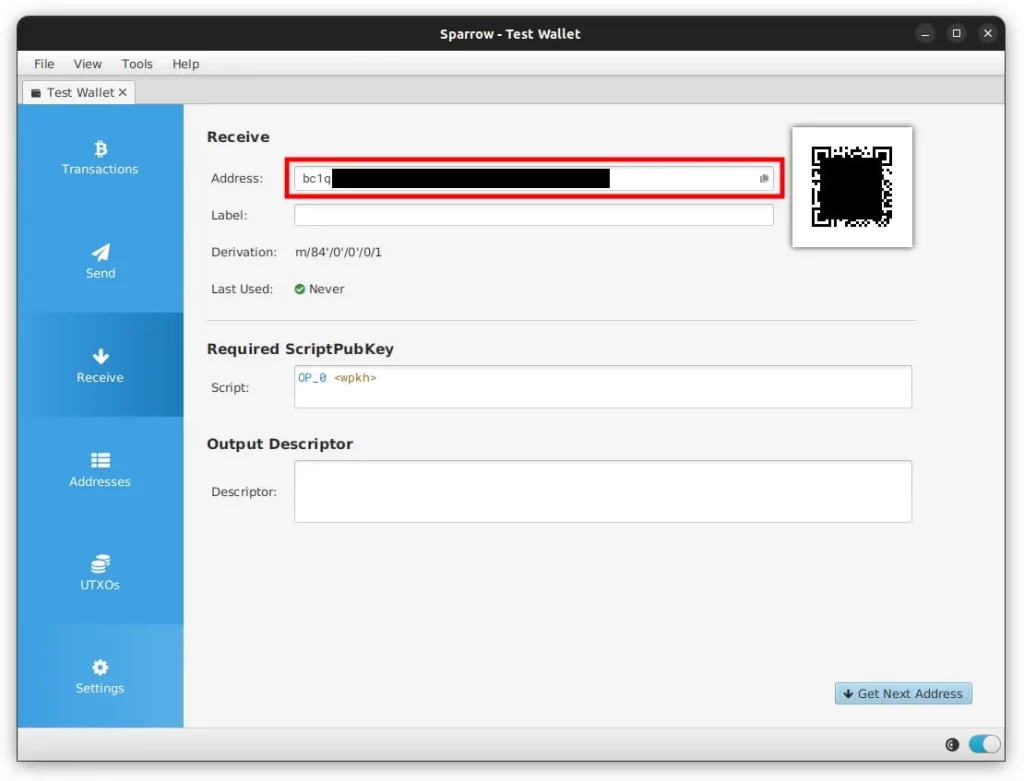
Verify & Label Vault Receive Address: Navigate to the Receive tab in Sparrow and copy the address that’s shown, in the label area just put “Receive Test” or similar. If you’re using air gapped Hardware Wallets, navigate to its Address Viewer and confirm that all the characters (not just the first few and last few) in the address match. If you have a USB connected Hardware Wallet, you can click the Display Address button in the bottom right hand corner to have it be displayed on your Hardware Wallets screen
Send Test Funds To Vault: Send a small amount of bitcoin (preferably non-KYC) to this receive address from another wallet and wait for at least 1 block confirmation before moving on. If you are depositing bitcoin that is already in your custody, you’ll see it show up in your transaction history as a pending transaction, almost immediately. If you are receiving bitcoin from a custodian, such as an exchange, you might not detect it until the custodian processes and broadcasts the transaction, which could be minutes or even hours
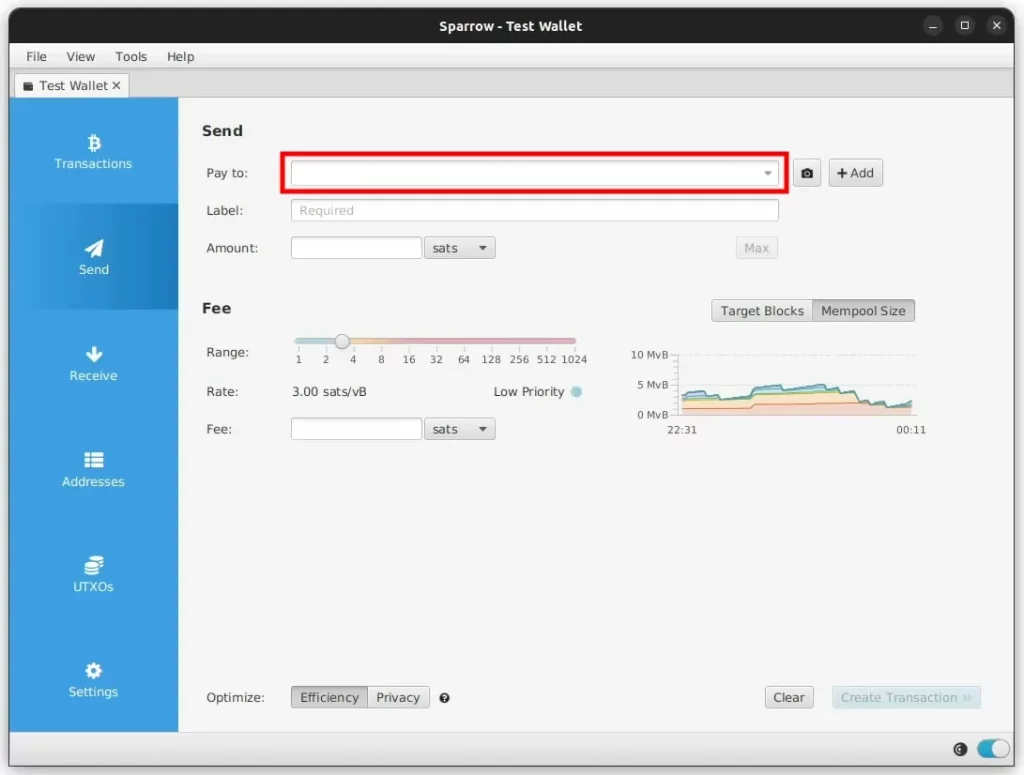
Send Test Funds From Vault: Navigate to the Send tab in Sparrow and paste in a Pay To address, in the label area just put “Spend Test” or similar. You can also choose to spend a specific UTXO by going to the UTXOs tab, clicking the UTXO and then Send Selected.
We have a dedicated piece on How To Send Bitcoin, so we won’t go through too much detail here, but you’ll then need to enter in your Amount and the Fee too. Before clicking Create Transaction you should check:
- Are you transferring from / to the correct accounts and addresses?
- Are the fund amounts being transferred correct? Are the decimal places correct?
- Is the fee rate optimal for how quickly you’d like the transaction to be confirmed?
- Are you using the correct input UTXO(s)? Are they going to compromise your privacy?
- Does the change address appear in the list of controlled change addresses?
Once you’ve gone through the above, click the Create Transaction button and then Finalize Transaction For Signing. Down the bottom you should now see multiple different signing options such as QR or Save Transaction file as well as two empty signature boxes to fill.

Sign With Two Private Keys: Sparrow has now created what’s called a Partially Signed Bitcoin Transaction (PSBT). As the name suggests, this is a transaction that hasn’t been fully signed by all the Private Keys in the Vault. In order for this transaction to be valid, at least 2 of the 3 Private Keys in the vault must sign it.
As you sign the transaction with the various Hardware Wallets, these boxes will fill up. Once full, you will then be able to broadcast the transaction. Signing with a Hardware Wallet can be done in three ways:
- QR Code: Sparrow presents the PSBT data as a QR code which the Hardware Wallet scans with its camera. It then signs the transaction and displays another QR code on its screen. You then scan this second QR code back into Sparrow using your computers camera
- microSD Card: Sparrow saves the PSBT data to a microSD card which you then insert into the Hardware Wallet. It then signs the transaction and saves a second file onto the microSD card. You then put the microSD card back into your computer and Sparrow loads the transaction from that second file
- USB Signing: If you have a USB connected Hardware Wallet, you simply click the Sign button and it will transfer the PSBT data to the Hardware Wallet for you to sign
Once you’ve signed using any two of the three Private Keys, Sparrow should now show both boxes as filled in, indicating that the transaction has been fully signed and is now ready to broadcast. Note that as soon as you hit the Broadcast Transaction button, your transaction cannot be cancelled. So it’s best to do one last full check over all details to make sure everything is correct.
When ready, click Broadcast Transaction and Sparrow will send it to your connected Full Bitcoin Node to broadcast it to the Bitcoin network. Once broadcast, you should see it in the Vault Transactions tab as a transaction waiting to be confirmed into a block.
Caution: Be very careful not to search or lookup your transaction ID (Txid) using any public website like mempool.space as this will associate your transaction (and funds involved) with your public IP Address. Only use a private block explorer or a public one using a Tor browser
Finally wait and make sure that the withdrawal transaction is fully confirmed in at least 1 block confirmation. If all works well and your transaction is confirmed, you’ve now verified for yourself that your new Bitcoin multisig wallet and the three Private Keys that secure it have the authority to spend any funds you deposit in it.
Disaster Recovery Test
Now let’s imagine something bad has happened. Your house and all its contents, including the computer you’ve been working on so far with Sparrow has been completely lost to fire. All gone.
To simulate this use case on Sparrow, close the Vault wallet (just close the tab) and then shut down Sparrow. Open up a file explorer window and show hidden files. Next:
- On Ubuntu: Under the Home directory browse to the hidden “.sparrow” folder and completely delete the Vault file from the “wallets” folder along with any backups
- On macOS: Under the Home directory browse to the hidden “.sparrow” folder and completely delete the Vault file from the “wallets” folder along with any backups
- On Windows: Under the C:/Users/<USER>/AppData directory browse to the hidden “Sparrow” folder and completely delete the Vault file from the “wallets” folder along with any backups
This will remove all Vault wallet data, but leave Sparrow the program otherwise untouched. Open up Sparrow and your Vault wallet won’t be there anymore. You can imagine that this might be what you would face if the computer was lost in a fire, had to be reformatted or was stolen. You would get a new one, install Sparrow as per above and then be faced with this freshly installed version.
Now, to recover your Vault setup go and find your backup “.mv.db” file you created before. As noted, this file should have its own 3-2-1 backup solution, so if your house burnt down there should be a copy of it off-site somewhere for you to retrieve.
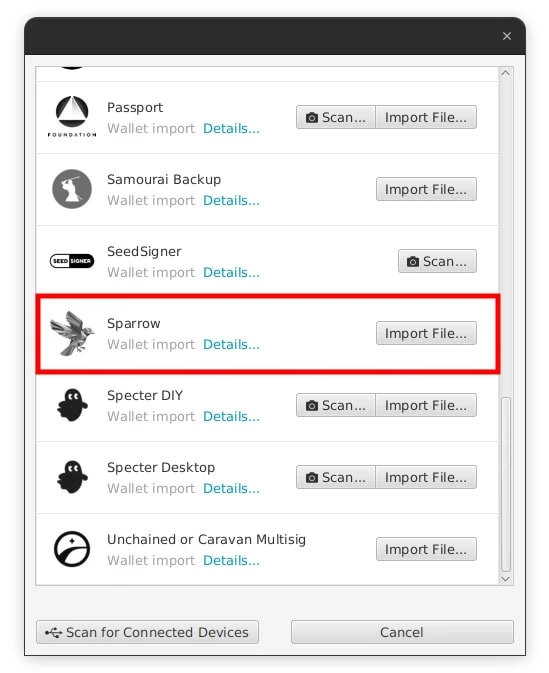
In Sparrow navigate to click the Import Wallet text then click Sparrow -> Import File. Select the copied over file and enter in the Sparrow Wallet Password you wrote down before. The Vault wallet should be imported and Sparrow will ask you to set a new password for it.
Enter the same password and the Vault should be fully recovered! You should also see your test receive and spend transactions in the Transactions tab and you can also check the Settings area to ensure the three Keystores match
If you don’t have access to the back up, off-site “.mv.db” wallet file, you can fully rebuild your Bitcoin multisig wallet using the three Hardware Wallets or three Recovery Seed cards just as before.
Deposit Funds
Now that creation and testing is completed, you are safe to deposit as much bitcoin as desired into your new Bitcoin multisig wallet Vault. We’d recommend creating and following your own personal Standard Operating Procedure (SOP) for this process to ensure it’s properly defined and consistent.
You should also have a Withdrawal SOP as well to ensure that if funds are sent from your Vault, that they’re sent only once you’ve performed all the required checks and balances. Things like verifying that the other party is real and genuine, that your computer is safe and not infected with malicious software, that you’ve checked and confirmed the pay to address and so on.
While you don’t need a Hardware Wallet to deposit funds into your Bitcoin multisig wallet, we recommend that you always have access to at least one of them so that you can confirm the receive address on its screen. This check ensures that the address you’re sending funds to is controlled by your Vault Private Keys.
Info: The most privacy preserving way to transfer funds into a new wallet is to send from one existing UTXO to a brand new address and not consolidate many UTXO’s into a new address. While this does take more transactions and cost more in transaction fees, it preserves privacy and ensures you end up with a range of various sized UTXO’s. Also try and spread the transactions over various times and various days
To get even more privacy during the process of moving all your funds over to your new Vault there are a few more techniques you can employ to help increase the entropy and thus, disconnect the old from the new wallet in the eyes of Chain Analysis firms:
- Network Privacy: In order to not show joint ownership (via a common IP Address) of the old and new wallet addresses, you should connect both wallets up to your own Full Bitcoin Node. This node should only connect to the Bitcoin Network via Tor so it doesn’t leak your IP Address
- Timing & Amounts: When sending each UTXO, don’t consolidate them all into 1 single new UTXO as mentioned, but also ensure you do each of the transactions at different, random times and with different, random and non-rounded amounts. This increases the entropy and makes tracking what outputs are change addresses, new owners and such more statistically uncertain and conceals privacy
- Misdirection: Consider the various forms of input and output types when performing transactions. Bitcoin Mixing via CoinJoin is one example, but there is also Submarine Swaps or channel creation in the Lightning Network or simply merging multiple inputs / outputs to imitate a multi-party payment
Once all your funds are safely aboard the new Vault, you can disperse your Wallet Packs!
Seed Storage
Now that all things have been setup you can distribute all the various Hardware Wallets, Recovery Seeds and microSD Cards to their secure, geographically distributed locations.
As mentioned in our previous two parts of this series, the ideal setup is to have six different highly secure locations. At each location there should only be one Hardware Wallet (with its encrypted microSD card backup) or one Recovery Seed.

Obviously most people don’t have six different highly secure locations though, so you will likely have to combine some Hardware Wallets with a Recovery Seed. If you do, we’d recommend not putting the Recovery Seed for one Private Key at the same physical location as the Hardware Wallet for that Private Key. For example, put Hardware Wallet 1 with Recovery Seed 2.
Organize the various elements into their separate Wallet Packs according to the location plans you’ve decided on. We recommend you place each item in an envelope or other container that can’t be seen through. This will help ensure strangers can’t just “look in” and see what’s inside, keeping things a bit more private.
Finally insert the envelopes into your Tamper Evident Bags and note the bags serial number down. Double check everything is where it should be and seal the envelopes and Tamper Evident Bags.
Caution: Store these Wallet Packs in secure, geographically distributed locations to ensure it requires a significant amount of time, effort and interaction with people (eg. guards with guns) in order to acquire the minimum number of signing keys
If you are storing any in a safety deposit box, ensure it’s run by a private company not a bank and don’t say anything about what you’re storing or why. If a private vault employee comes to know what it is you’re storing by accident, consider withdrawing the items and moving them to another location or institution. Also ensure you add a joint renter and/or next of kin to your account too.
Data Sanitation
Digital forensic techniques can be employed to read old data, even if it’s been previously “deleted”, off various data storage devices which can expose sensitive information about your funds.
Proper sanitation of digital media ensures the proper removal of all keys, eliminating the risk of information leakage from decommissioned devices like servers, hard disk drives, and removable storage devices.
After completing the above process, carefully consider what new data has been generated and written to various media. This could be on laptops or computers, microSD cards, USB drives or mobile phones.
Sanitize this generated data according to the below NIST 800-88 “Purge” instructions:
- Backup any other important data that may be on the drive
- Fully format the drive using the systems formatting tool, a single random pass is sufficient
- For Solid State Drives like USB flash drives, SSD’s or NVMe drives, if the manufacturer supports it, perform a secure erase and then a cryptographic erase
- Verify the purge of data is complete
Institutional Grade Bitcoin Custody
Phew. That’s a lot of instructions! But. You should now have all the information you need to design and build your own institutional grade Bitcoin custody solution. A 2-of-3 multisig Vault that is protected for a huge array of likely and not so likely attack vectors.
From you forgetting the PIN to your Hardware Wallet to a security vulnerability in how you generated your Private Key, your funds are extremely safe now for decades.
The other good news is that this solution is still absolutely state of the art. While there’s interesting new features like Time Locked Multisig setups or other wallets like Liana gaining traction, for now a “simple” 2-of-3 multisig wallet is what the bulk of whales use.
We’d also like to give a shout out to Unchained Capital who helped us review and fine tune this series to ensure it’s accuracy.


