In the ever changing landscape of cryptocurrency exchanges, Bisq has long been a beacon of privacy and security scoring one of the highest ratings of all our exchanges tested. If you’re a Windows user intrigued by the possibilities of using this revolutionary P2P exchange, this is the article for you.
In this simple step by step guide, we’re going to detail exactly how to install Bisq on Windows as well as ensure its rock-solid security by also outlining how to fully verify all signatures and file checksums.
If you use Ubuntu, we have a guide for that too: How To Install Bisq On Ubuntu
Contents
What is Bisq?
Bisq is an exceptionally well developed and decentralised P2P exchange that takes the form of an application rather than a websites you visit. Available on Windows, macOS and Linux, you simply download the program, verify its files and run it. No KYC. No invasive privacy companies, just peer to peer trading goodness.
It will automatically generate a self custody wallet and randomised user profile for you. This means no personal information is required to trade and with a thriving market – especially in USA and Europe – you can easily buy up to 2 BTC per transaction with dozens of payment methods.
>> Deeper Dive: Bisq Exchange Review: The King Of Privacy And Security
Features
- Non KYC: Just download the software and run it, no accounts, no verification processes
- Decentralised: Fully decentralised with no trading servers or single servers to be blocked
- Peer-to-Peer: Trades are fully P2P again with no centralised servers recording information
- Multisig Escrow: 2-of-2 multisig escrow wallets ensure safe and efficient trading
- Private: All data is only stored locally on your computer
- Simple UI: Clear UI with extensive support videos, guides and forums for help
- Multi-platform: Supports Windows, Mac plus Ubuntu, Debian, Redhat, Fedora, Arch
- Grows With You: Start with a public server, then connect to your own Bitcoin Node later on
- FOSS: All code is free under the AGPL-3.0 license and Open Source here
- Tor: Built in Tor that’s enabled by default to enhance your privacy and security
- Fee Control: Set your Transaction Fees manually when sending to another wallet
- Coin Control: Pick and choose which UTXO’s you send when creating transactions
- Import/Export: Excellent backup and restore functions for both trading and wallet data
What Is Verification?
Verification is an important step when dealing with Crypto Exchanges software. It tests a number of things to ensure that the files you’re downloading, installing and trusting with your bitcoins are the same as what the original developer wrote and compiled. It also ensures that when you download the files from the website, they don’t get altered by a man-in-the-middle attack.
This verification process isn’t unique to Bitcoin (it exists for all other apps too), but when it comes to a Bitcoin Exchange, it’s a lot more important as you’re trusting it with something valuable so it’s important to make sure you do it every time you download and update the application. Verification of the files is done in two parts by checking that the PGP keys match and then checking that the file checksums match.
New to Athena Alpha? Start today!
How To Install Bisq On Windows
Step 1: Download The App, Signature & Key Files
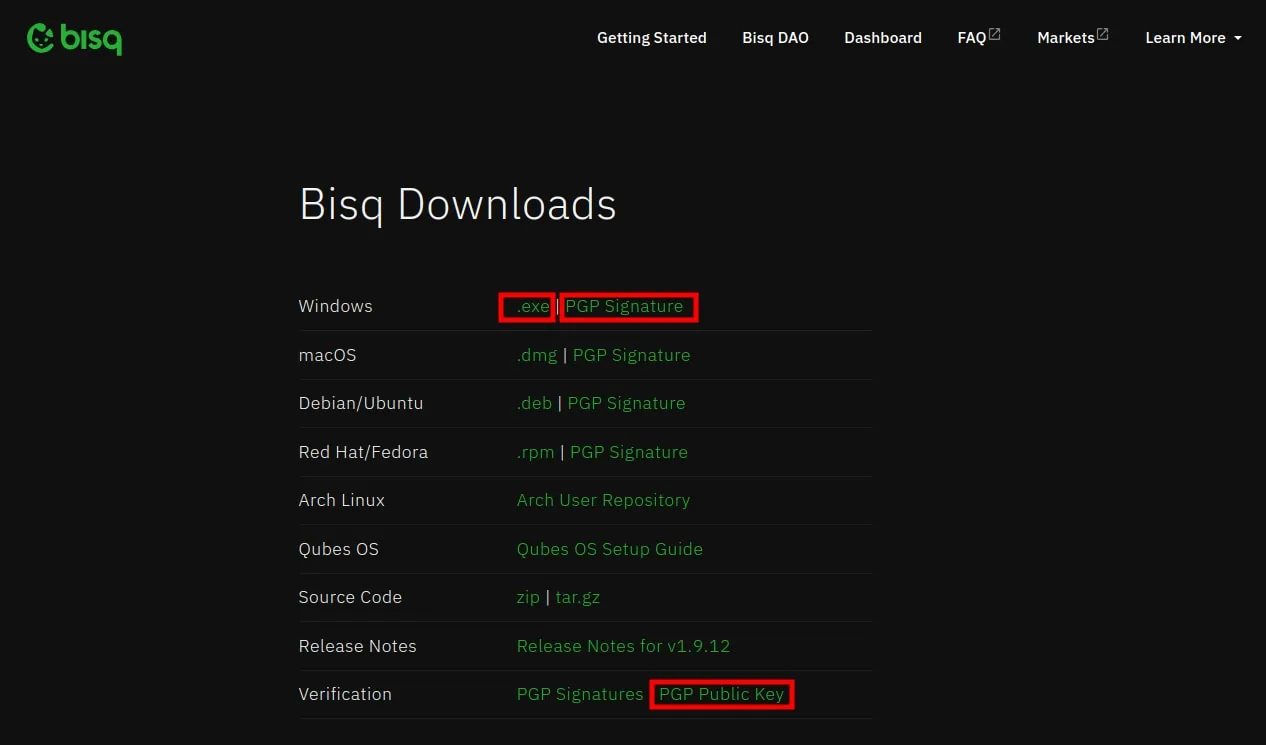
We recommend doing this over Tor, using the Tor Browser. This ensures that your IP Address is hidden and that you’re downloaded Bitcoin Exchange software isn’t linked to your real world identity by ISPs.
Browse to https://bisq.network/downloads/ (be sure of spelling as well as “.network”) and download the Windows .exe file. Also download the PGP Signature and PGP Public Key files as these are needed for the verification process. The PGP Public Key is for Alejandro García, one of the developers of Bisq and is the E222AA02.asc file that’s downloaded.
Step 2: Import The PGP Key
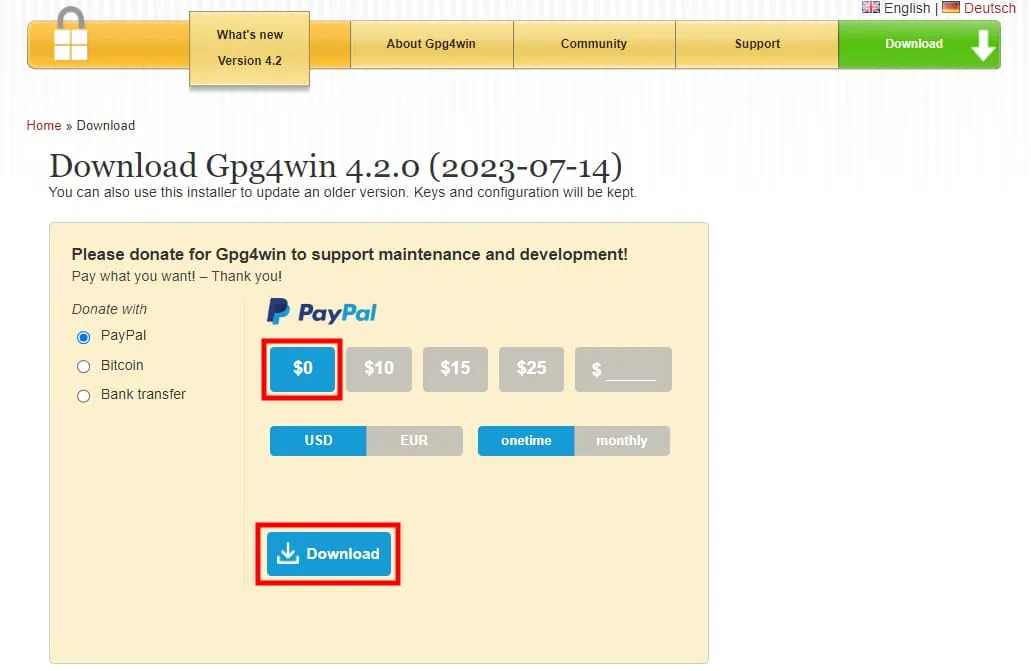
In order to import the PGP Key in Windows, you need a 3rd party program. The one recommended by Bisq is Gpg4win and can be downloaded for free at: https://www.gpg4win.org/get-gpg4win.html. Open up the link, click the $0 donation option and the Download button will appear.
Once downloaded, Install it and then Open the application (it’s called Kleopatra). Click on the Import button in the main window and select the E222AA02.asc file we saved before. It should report that 1 key has been imported.
Step 3: Verify The signature
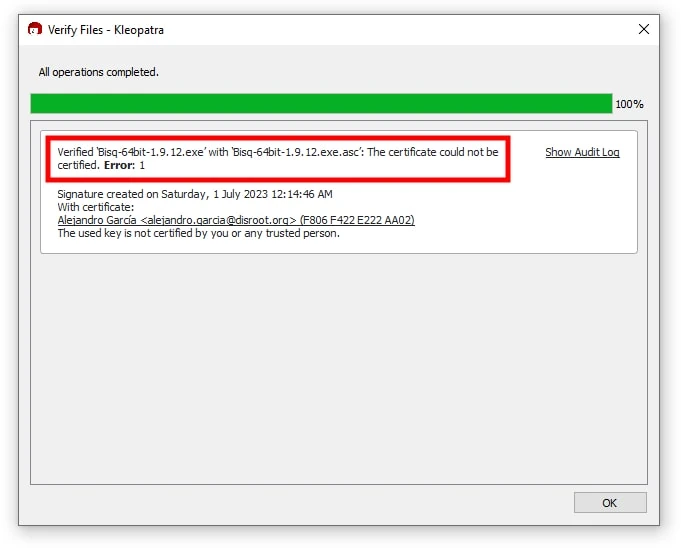
With Kleopatra still open in the background, ensure that the Bisq-64bit-1.9.12.exe file as well as the Bisq-64bit-1.9.12.exe.asc file are both in the same folder. Open the Bisq-64bit-1.9.12.exe.asc file by double clicking on it.
This will open a new window in Kleopatra as per the above image. It should read “Verified ‘Bisq-64bit-1.9.12.exe’ with ‘Bisq-64bit-1.9.12.exe.asc'”. It will also say “The certificate could not be certified. Error: 1” in bold, but you can disregard this.
Assuming all operations completed, then verification of the signature is successful.
Step 4: Install The Program
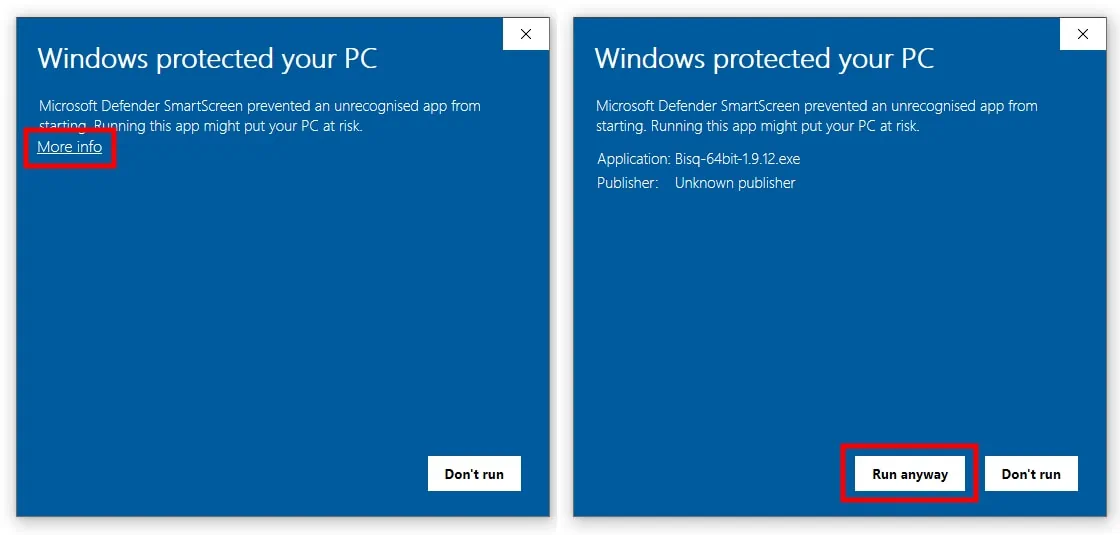
Now that we’ve verified that the files we’ve downloaded are legitimate, we can go ahead and install the program just like any other program. Once you Double Click the .exe file, you might get a “Windows protected your PC” popup from Microsoft Defender. Click on the More Info link and then the Run Anyway button that appears then wait for the installation process to finish.
Step 5: Download The Hash File
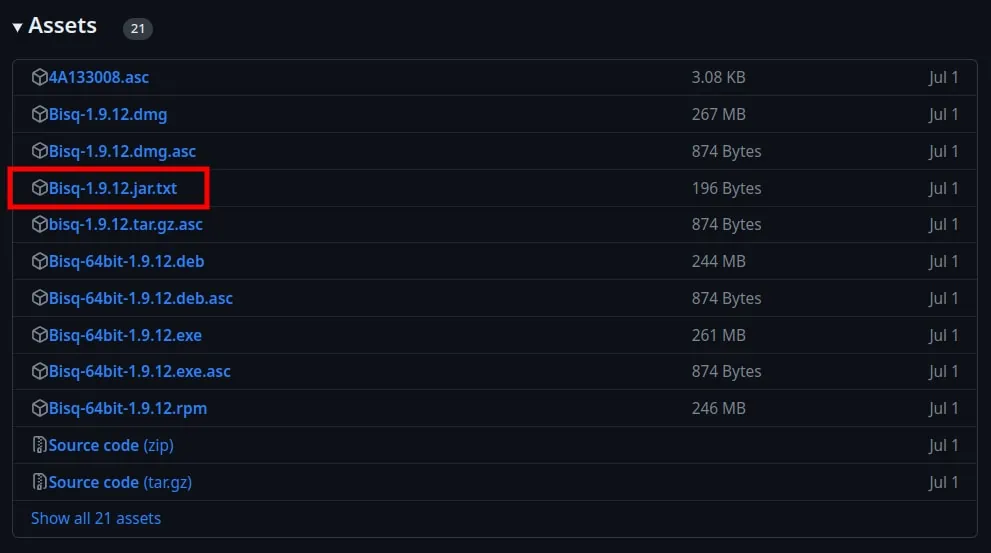
For the last verification check we need to calculate the SHA256 Sum for the Java file we’ve just installed and compare that hash to what’s provided. This check ensures the files haven’t been altered by a malicious third party since Alejandro built them.
Browse to https://bisq.network/downloads/ again (be sure of spelling as well as “.network”) and click on the link that says: Release Notes for v1.9.12. This will take you to the GitHub page for the latest release.
Scroll down to the Assets section and download the Bisq-1.9.12.jar.txt file as shown. This text file contains 3 hashes for macOS, Linux and Windows. It will just look like a bunch of random text, but leave the text file open.
Step 6: Verify The Jar Files Checksum
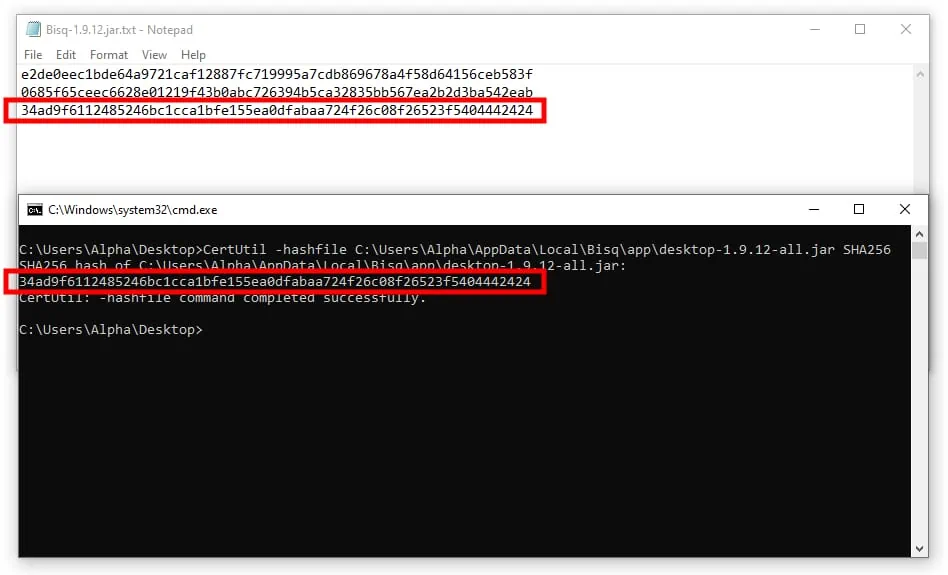
Open up a Command Prompt window, and issue the command:
CertUtil -hashfile C:\User\<USERNAME>\AppData\Local\Bisq\app\desktop-1.9.12-all-jar SHA256
Note that you will have to edit the command so that it has your specific username in it and so that it also matches your version number. This should spit out a bunch of random text which is the hash for the installed Java file.
Now compare the hash that’s been calculated to the ones in your opened Bisq-1.9.12.jar.txt text file. You should see a match appear as shown in the image above. This indicates that the checksums match and you’ve verified all files.
Congratulations, you’ve verified and installed everything successfully! One final note is that when you open Bisq for the first time you will need to allow access for it through the Windows Defender Firewall.
Verifying Bisq Updates
While most applications require you to verify the files when you first install it and then also every subsequent time that it gets updated, Bisq only needs verification for the initial install. After Bisq is installed it automatically looks for new updates, notifies you of them and then downloads them over Tor and verifies the binaries for you all in one go.
This is a fantastic feature as it not only increases user privacy and security, but does so in a fully automatic and default way. Too often programs set the default setting to be less secure or private, so it’s a huge signal that the developers not only respect privacy and security, but put a priority on it too.
Dive Deeper: Bisq Ultimate Quick Start Guide For Beginners
Connection And Trade View
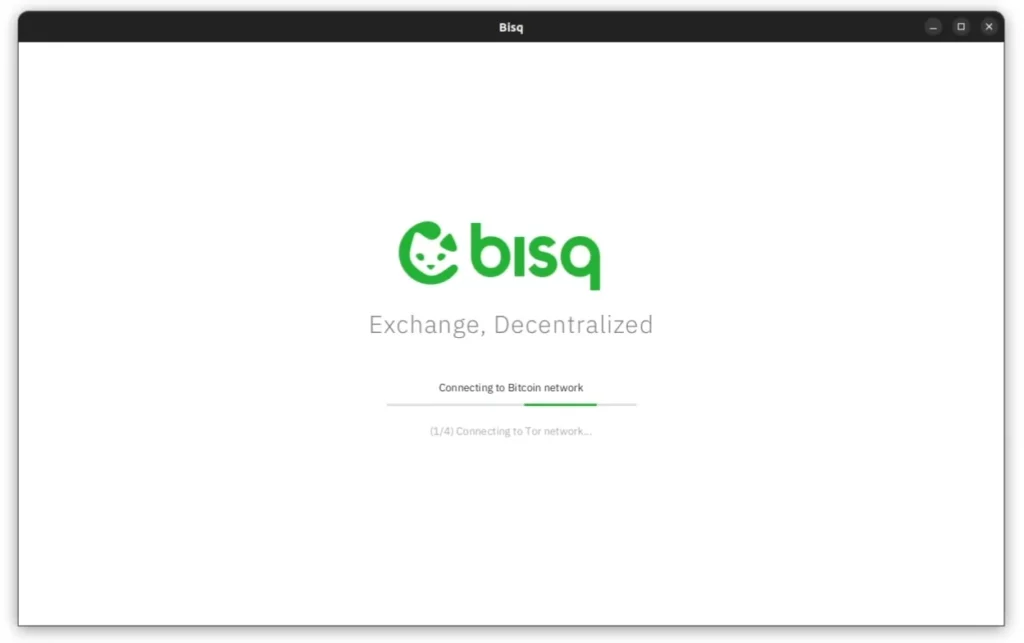
Once you’ve installed Bisq, the app will automatically setup Tor and connect to multiple Bitcoin Nodes by default to broadcast transactions as well as just generally run the built in Bitcoin Wallet and trade functions. It also connects to the Bisq Network, which you’re now a part of, in order to view, make and take trade offers. As said, Bisq is a truly decentralised exchange!
After syncing with the Bitcoin Mainnet via Tor, you’ll be shown the main trade view screen. From here you can sell or buy Bitcoin, change currencies and just view all the trade offers that are available in general.
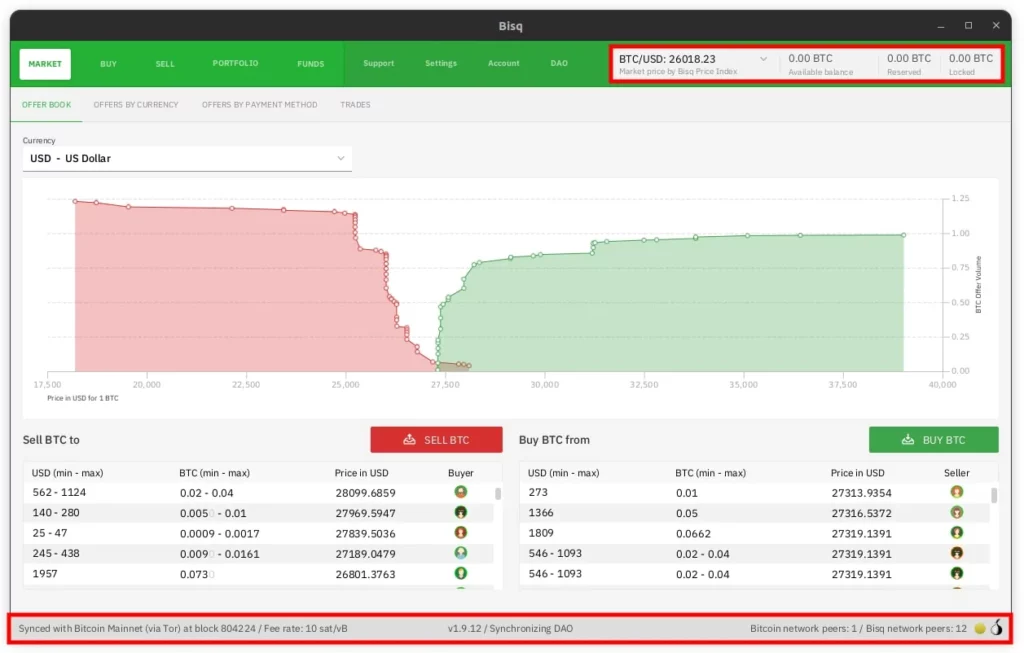
In the top right hand corner you have details of the exchange rate for your chosen currency as well as details on how much is in your wallet. Down the bottom there’s also a very helpful bar of information including the fee rate for the Bitcoin Network, how many peers you’re connected to and status information in the middle such as whether you’re syncing with the Bisq DAO.
Be aware that while Bisq is syncing with the Bisq DAO, it can be very taxing on your computer CPU. It’s also not advised to make or take offers until it’s finished as otherwise it can cause problems. Just allow it 5-10 minutes for it to do its thing and then it should be fine.
If you want step by step instructions on how to make your first trade using Bisq, check out our How To Buy Bitcoin On Bisq guide. It covers everything from funding your Bisq wallet, to setting up payment methods and the entire buying process start to finish.
Or if you have your own Umbrel Full Bitcoin Node, you can use our How To Connect Bisq To Umbrel guide and increase your privacy and security even more.
FAQ
Does Bisq Have An App?
Yes and No. While Bisq does have legitimate Android and iPhone apps available, these are “Notification” apps only. They connects back to your own computer – that’s running the full Bisq program – to notify you of updates on the go. They are not stand alone apps that you can buy and sell Bitcoin on. Any other Android or iPhone apps claiming to be Bisq should be reported as malicious.
how to stop windows from blocking bisq
If you see a “Windows protected your PC” popup from Microsoft Defender blocking you from installing Bisq, you can simply click the More Info link and then click the Run Anyway button that appears. This will allow you to install Bisq. You may also have to allow Bisq to access the Microsoft Defender Firewall when asked.
What Payment Methods Does Bisq Support?
There are over 50 payment methods available on Bisq including many popular options such as ACH, Faster payments, Interac e-Transafer, Bank Transfer, Revolut, TransferWise, Face-to-Face, Cash by mail and more. You can find the full list here.
What Fees Does Bisq Charge?
Even though Bisq fees have just recently increased, they’re still quite low compared to nearly every other exchange. While many other exchanges charge 1%, 2% or even 4% you can create your own offer (Maker) to buy or sell bitcoin on Bisq and only pay 0.15%. For Takers the fee is 1.15%.
Is Bisq Safe To Download?
Yes. Provided you download the files from the main Bisq website (https://bisq.network/downloads/) and complete the above verification steps you can be sure that you’re installing safe and verified software.
How To Setup A Bisq Account
Bisq, unlike most other exchanges, doesn’t use accounts. All data is stored locally on your computer and there are no KYC or other verification processes to do. You just open the app and start trading!

